Snapshot Fuzzing #
Introduction #
Snapshot fuzzing is the process of taking a snapshot of the target program or OS—of the memory state, register state, or other information needed to resume execution—then continuing execution in an emulated environment, mutating data in memory, and resetting the program back to the original snapshot state when the execution crashes or reaches a specified point.
Snapshot fuzzing has many advantages:
- Snapshot fuzzing can be fast, as the program does not need to start up on each test run. You can snapshot the program at the desired state (e.g., when a file is loaded) and start testing from there.
- The process is fully deterministic or has a high level of determinism.
- The target always starts with the same state.
- The same fuzz input should give the same result.
- Testing results in no unreproducible crashes.
- Any difference in execution is due to the user input, not some unknown state.
- No source is needed (but of course, symbols can help).
- It is easy to track code coverage, detect crashes, and track dirty memory.
It also has some disadvantages:
- Preparing a snapshot is time-consuming and error-prone.
- For example, to target a Windows program, you must set up KDNET, create a VM snapshot, prepare a harness, and take other time-consuming steps.
- Existing fuzzers have many minor bugs, and you need to have tacit knowledge to make them run under specific circumstances. For example, you must know that to execute a specific target using a specific emulating back end, you have to strip a specific register’s bits; otherwise, you will have errors.
In this Testing Handbook chapter, we will demonstrate snapshot fuzzing on a Windows kernel driver using a fuzzer built with the tool what the fuzz (wtf), a distributed, code-coverage-guided, customizable, cross-platform snapshot-based fuzzer designed for user- and kernel-mode targets. It is mainly implemented for Windows, but there are extensions to support other platforms:
Other notable snapshot fuzzers include the following:
See this blog post for the story behind wtf and its use in fuzzing IDA, and this blog post series on developing a custom snapshot fuzzer.
Prerequisites #
In our tutorial, the host machine is a developer’s machine using WinDbg to debug the guest machine with the kernel driver over a network (using KDNET). The host machine is a Windows 11 (x64) machine running Hyper-V with a guest Windows 11 dev environment VM.
Also note the following:
- You won’t be able to create a snapshot (dumping the state of a CPU and the physical memory) in a WinDbg extension in VMware, as a years-old bug in VMware prevents snapshotting software from working properly.
- You can consider using VirtualBox with VirtualKD (assuming you’re using a Windows host).
Preparing the host machine #
- Enable Hyper-V.
- Install Visual Studio 2022, the Windows SDK, WDK, CMake, and Git.
- (Optional) Install Rust to build dependencies necessary for triaging crashes.
- Install the WinDbg debugger, if not already installed.
- Configure debug symbols in WinDbg. The first line in the
Symbol pathssetting should include a symbol server and local cache path (C:\symbols) for Windows symbols. Other lines could be used as symbols for your specific target (such as a kernel driver). - Clone the repositories.
- The
wtfrepository - The
symbolizer-rsrepository (optional, required only for triaging crashes)
- The
- Download the snapshot WinDbg extension.
- Open the
Visual Studio Developer Command Prompt, then move to the previously cloned
wtf\src\builddirectory and run thebuild-release-msvc.batscript. The compilation should finish without any errors, and the last line should provide you with the path to the compiled wtf binary (wtf.exe). Ensure that you can run the compiledwtf.exebinary (for example, usingC:\Users\user\wtf\src\build\RelWithDebInfo\wtf.exe --help).
Initial preparation of the guest machine #
- [HOST] Create a new
guest VM in Hyper-V.
- Edit the settings of the created VM:
- Assign only one virtual processor.
- Specify only 4 GB of RAM.
- Disable Secure Boot.
- Edit the settings of the created VM:
- [GUEST] Download the Windows SDK installer. When running the installer, select “Debugging Tools for Windows.”
- [GUEST] Disable
KVA Shadow—this is necessary when fuzzing a userland application. Download the wtf tool’s
disable-kva.cmdscript, run it as an administrator, and reboot the machine. - [GUEST] Configure KDNET, following
this guide (or refer to the
official Microsoft guide).
a. If running thebcdeditcommands in PowerShell, remember to insert--%afterbcdeditbut before the following arguments to suppress PowerShell parsing.
b. Open a terminal on your host machine, run theipconfigcommand, and note the IPv4 address in the “Ethernet Adapter vEthernet (Default Switch)” section; this is the IP address you should use for thehostipvalue in thebcdedit/dbgsettingscommands referenced in the guide.
At this point of the tutorial, you should ensure you can run WinDbg on the host machine and debug the guest VM using the Attach to kernel feature.
Creating the Windows driver #
Follow the
official Windows tutorial to create the driver (which we name KmdfHelloWorld), but replace the Driver.c file with the following source code.
#include <ntddk.h>	// Core Windows kernel definitions for all drivers

#define NT_DEVICE_NAME	L"\\Device\\KmdfHelloWorld" // Name of the device object
#define DOS_DEVICE_NAME L"\\??\\KmdfHelloWorldLink" // MS-DOS device name

// The IOCTL function codes for customer use:
#define IOCTL_MESSAGE_PROCESS_MESSAGE \
    CTL_CODE( FILE_DEVICE_UNKNOWN, 0x800, METHOD_BUFFERED, FILE_ANY_ACCESS)

// Declarations for callbacks
VOID
PrintIrpInfo(
    PIRP Irp
);

BOOLEAN
CheckTimestamp(
    LARGE_INTEGER time
);

DRIVER_INITIALIZE DriverEntry;
_Dispatch_type_(IRP_MJ_CREATE)
_Dispatch_type_(IRP_MJ_CLOSE)
DRIVER_DISPATCH OnCreateClose;

_Dispatch_type_(IRP_MJ_DEVICE_CONTROL)
DRIVER_DISPATCH OnDeviceControl;
DRIVER_UNLOAD OnUnloadDriver;

// Driver's initialization routine
NTSTATUS
DriverEntry(
    _In_ PDRIVER_OBJECT		DriverObject,
    _In_ PUNICODE_STRING	RegistryPath
)
{
    // NTSTATUS variable to record success or failure
    NTSTATUS ntStatus;

    UNICODE_STRING ntUnicodeString; // NT Device Name (NT_DEVICE_NAME)
    UNICODE_STRING ntWin32NameString; // Win32 Name (DOS_DEVICE_NAME)
    PDEVICE_OBJECT deviceObject = NULL;

    UNREFERENCED_PARAMETER(RegistryPath); // Avoid compiler warning about the unused RegistryPath parameter

    // Initialize a Unicode strin with the NT_DEVICE_NAME
    RtlInitUnicodeString(&ntUnicodeString, NT_DEVICE_NAME);

    ntStatus = IoCreateDevice(
        DriverObject,				// Pointer to the driver object
        0,							// Don't use a device extension
        &ntUnicodeString,			// A buffer containing the name of the device object
        FILE_DEVICE_UNKNOWN,		// A device type
        FILE_DEVICE_SECURE_OPEN,	// Device characteristics - FILE_DEVICE_SECURE_OPEN "Directs the I/O manager to apply the security descriptor of the device object to relative opens and trailing file name opens for the device"
        FALSE,						// Specifies if the device object represents an exclusive device. If exclusive access to a device is enabled, only one handle to the device can be open at a time
        &deviceObject				// Pointer to a variable that receives a pointer to the newly created DEVICE_OBJECT structure
    );

    if (!NT_SUCCESS(ntStatus)) {
        DbgPrint("Couldn't create the device object\n");
        return ntStatus;
    }

    // Initialize the driver object with a subset of major function codes (create, close, device I/O control)
    DriverObject->MajorFunction[IRP_MJ_CREATE] = OnCreateClose;
    DriverObject->MajorFunction[IRP_MJ_CLOSE] = OnCreateClose;
    DriverObject->MajorFunction[IRP_MJ_DEVICE_CONTROL] = OnDeviceControl;

    // The routine to perform any operations necessary before the system unloads the driver
    DriverObject->DriverUnload = OnUnloadDriver;

    // Initialize a Unicode String with the DOS_DEVICE_NAME
    RtlInitUnicodeString(&ntWin32NameString, DOS_DEVICE_NAME);

    // Create a symlink between the device name and the DOS device name
    ntStatus = IoCreateSymbolicLink(&ntWin32NameString, &ntUnicodeString);

    if (!NT_SUCCESS(ntStatus)) {
        // Remove a device object from the system when unable to create a symlink
        DbgPrint("Unable to create a symlink\n");
        IoDeleteDevice(deviceObject);

        return ntStatus;
    }

    return ntStatus;
}

// Routine to unload a driver - the OS calls this function when the callout driver is unloaded from the system.
VOID OnUnloadDriver(_In_ PDRIVER_OBJECT DriverObject)
{
    PDEVICE_OBJECT deviceObject = DriverObject->DeviceObject;
    UNICODE_STRING uniWin32NameString;

    // Initialize a Unicode String with the DOS_DEVICE_NAME
    RtlInitUnicodeString(&uniWin32NameString, DOS_DEVICE_NAME);

    // Delete the symlink
    IoDeleteSymbolicLink(&uniWin32NameString);

    if (deviceObject != NULL) {
        // Remove a device object from the system
        IoDeleteDevice(deviceObject);
    }
}

// The routine to handle IRPs Open and Close
NTSTATUS OnCreateClose(PDEVICE_OBJECT DeviceObject, PIRP Irp) {
    UNREFERENCED_PARAMETER(DeviceObject);
    //PAGED_CODE();

    // Fill the status of the IRP
    Irp->IoStatus.Status = STATUS_SUCCESS;
    Irp->IoStatus.Information = 0;

    // The caller has completed all processing for a given I/O request
    // return the given IRP to the I/O manager
    IoCompleteRequest(Irp, IO_NO_INCREMENT);

    return STATUS_SUCCESS;
}


// User-mode application sends IOCTLs to the driver by calling DeviceIoControl
// and causes the I/O manager to create an IRP_MJ_DEVICE_CONTROL request and set it to the driver
// So here we have the general logic when handling our IOCTL
NTSTATUS
OnDeviceControl(
    PDEVICE_OBJECT DeviceObject,	// A pointer to the device object
    PIRP Irp						// A pointer to the IRP for the request
)
{
    PIO_STACK_LOCATION	irpSp = NULL; // Pointer to the current stack location
    NTSTATUS			ntStatus = STATUS_SUCCESS;

    CHAR* kernelProphecyMessage = "The day has not yet come"; // Message from the kernel
    size_t kernelProphecyMessageLength = strlen(kernelProphecyMessage) + 1;

    LARGE_INTEGER systemTime; // To store time

    UNREFERENCED_PARAMETER(DeviceObject);

    //PAGED_CODE();

    irpSp = IoGetCurrentIrpStackLocation(Irp); // Get the pointer to the current stack location

    switch (irpSp->Parameters.DeviceIoControl.IoControlCode) { // Check the IOCTL function code passed to the device driver
    case IOCTL_MESSAGE_PROCESS_MESSAGE:
        DbgPrint("Called IOCTL_MESSAGE_PROCESS_MESSAGE\n");

        DbgPrint("Input received from userland: %s", (char*)Irp->AssociatedIrp.SystemBuffer);

        PrintIrpInfo(Irp);

        CHAR* messageFromUserland = (char*)Irp->AssociatedIrp.SystemBuffer;
        DbgPrint("[EXPLOIT] messageFromUserland: %s\n", messageFromUserland);

        // It is only possible to invoke vulnerability on doomsday (1234567890 Unix time)

        // Get time
        KeQuerySystemTime(&systemTime);

        BOOLEAN doomsDay = CheckTimestamp(systemTime);

        if (doomsDay) {
            DbgPrint("The time has come...");

            // Vulnerability
            if (strcmp(messageFromUserland, "DEADBEEF\x00") == 0) {
                unsigned int* bad_ptr;
                bad_ptr = (unsigned int*)0xdeadbeef;
                DbgPrint("Killing :O\n");
                *bad_ptr = 'X'; // kill :O
            }
        }

        // Send the prophecy back to the user land
        // IoStatus is the status of the IRP
        Irp->IoStatus.Information = kernelProphecyMessageLength; // The number of bytes written
        Irp->IoStatus.Status = STATUS_SUCCESS;

        DbgPrint("Sending to userland: %s\n", kernelProphecyMessage);
        DbgPrint("IMPORTANT: strlen of messageFromKernel: %lld\n", kernelProphecyMessageLength);

        RtlCopyMemory(Irp->AssociatedIrp.SystemBuffer, kernelProphecyMessage, kernelProphecyMessageLength);
        IoCompleteRequest(Irp, IO_NO_INCREMENT);

        return STATUS_SUCCESS;
    default:
        // Unrecognized I/O control code
        ntStatus = STATUS_INVALID_DEVICE_REQUEST;
        DbgPrint("ERROR: uncrecognized IOCTL %x\n",
            irpSp->Parameters.DeviceIoControl.IoControlCode);
        return ntStatus;
    }
}

// Print some members of the IRP structure for debug purpose
VOID
PrintIrpInfo(
    PIRP Irp)
{
    PIO_STACK_LOCATION  irpSp;
    // Get the pointer to the I/O stack location
    irpSp = IoGetCurrentIrpStackLocation(Irp);

    //PAGED_CODE();

    // Get the `SystemBuffer` member used when the I/O manager uses the METHOD_BUFFERED
    // for passing the user's buffer to the driver
    DbgPrint("\tIrp->AssociatedIrp.SystemBuffer = 0x%p\n",
        Irp->AssociatedIrp.SystemBuffer);

    // The UserBuffer is the pointer to the buffer provided by the client that initiated I/O operation
    DbgPrint("\tIrp->UserBuffer = 0x%p\n", Irp->UserBuffer);

    // Get the buffer size for input data
    DbgPrint("\tirpSp->Parameters.DeviceIoControl.InputBufferLength = %d\n",
        irpSp->Parameters.DeviceIoControl.InputBufferLength);

    // Get the buffer size for output data
    DbgPrint("\tirpSp->Parameters.DeviceIoControl.OutputBufferLength = %d\n",
        irpSp->Parameters.DeviceIoControl.OutputBufferLength);

    return;
}

BOOLEAN
CheckTimestamp(LARGE_INTEGER currentTime) {
    // Calculate Unix time
    LONGLONG unixTime = (currentTime.QuadPart - 0x019DB1DED53E8000) / 10000000;

    DbgPrint("Unix time: %lld\n", unixTime);

    if (unixTime == 1234567890) {
        return TRUE;
    }
    return FALSE;
}
Next, deploy and install the driver on the guest VM (remember that you need to reboot after installing it).
Userland communication program #
On the host machine, compile the following program to communicate with the driver:
#include <iostream>
#include <windows.h>

#define IOCTL_MESSAGE CTL_CODE(FILE_DEVICE_UNKNOWN, 0x800, METHOD_BUFFERED, FILE_ANY_ACCESS)

int main(int argc, char *argv[])
{
    CHAR inBuffer[128] = { 0 };
    CHAR outBuffer[128] = { 0 };

    HANDLE device = INVALID_HANDLE_VALUE;
    BOOL status = FALSE;
    DWORD dwbytesRead = 0;

    RtlCopyMemory(inBuffer, argv[1], strlen(argv[1])+1);

    device = CreateFileW(L"\\\\.\\KmdfHelloWorldLink", GENERIC_WRITE | GENERIC_READ | GENERIC_EXECUTE, 0, 0, OPEN_EXISTING, FILE_ATTRIBUTE_SYSTEM, 0);

    if (device == INVALID_HANDLE_VALUE)
    {
        printf_s("Unable to open the device: 0x%x\n", GetLastError());
        return FALSE;
    }

    printf_s("Sending a message\n");
    status = DeviceIoControl(device, IOCTL_MESSAGE, inBuffer, sizeof(inBuffer), outBuffer, sizeof(outBuffer), &dwbytesRead, (LPOVERLAPPED)NULL);
    printf_s("Message sent!\n");
    printf_s("Received a message: %s\n", outBuffer);
    CloseHandle(device);

    return TRUE;
}
Then, copy the program (userland.exe) to the guest VM—for example,
share a local disk using Hyper-V’s enhanced session mode.
The following diagram shows the interaction between the userland program and the Windows driver:
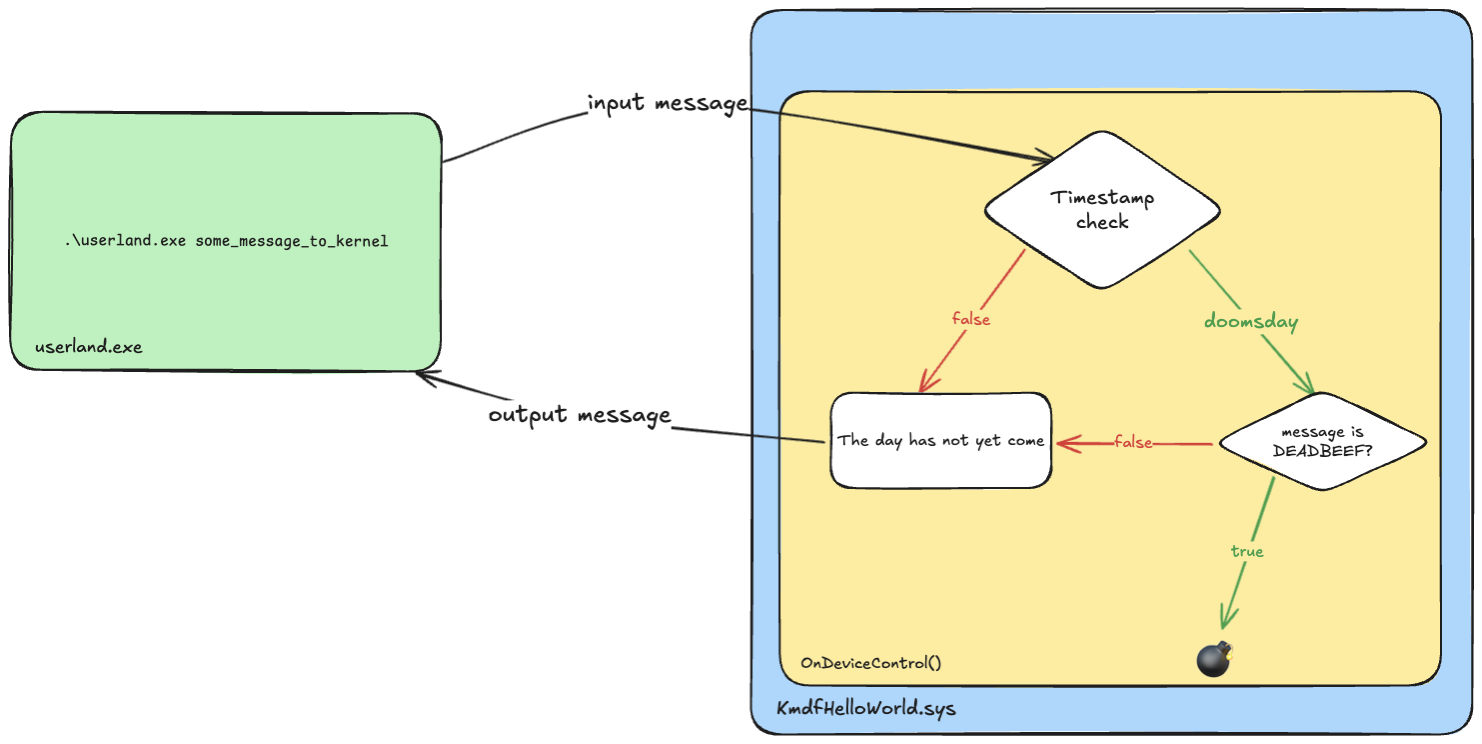
userland.exe programTaking a system snapshot #
Add PDB symbols for the KmdfHelloWorld driver in WinDbg on the host machine. During the driver compilation process, the PDB file is created on the host machine with the *.sys file in the x64\Release directory.
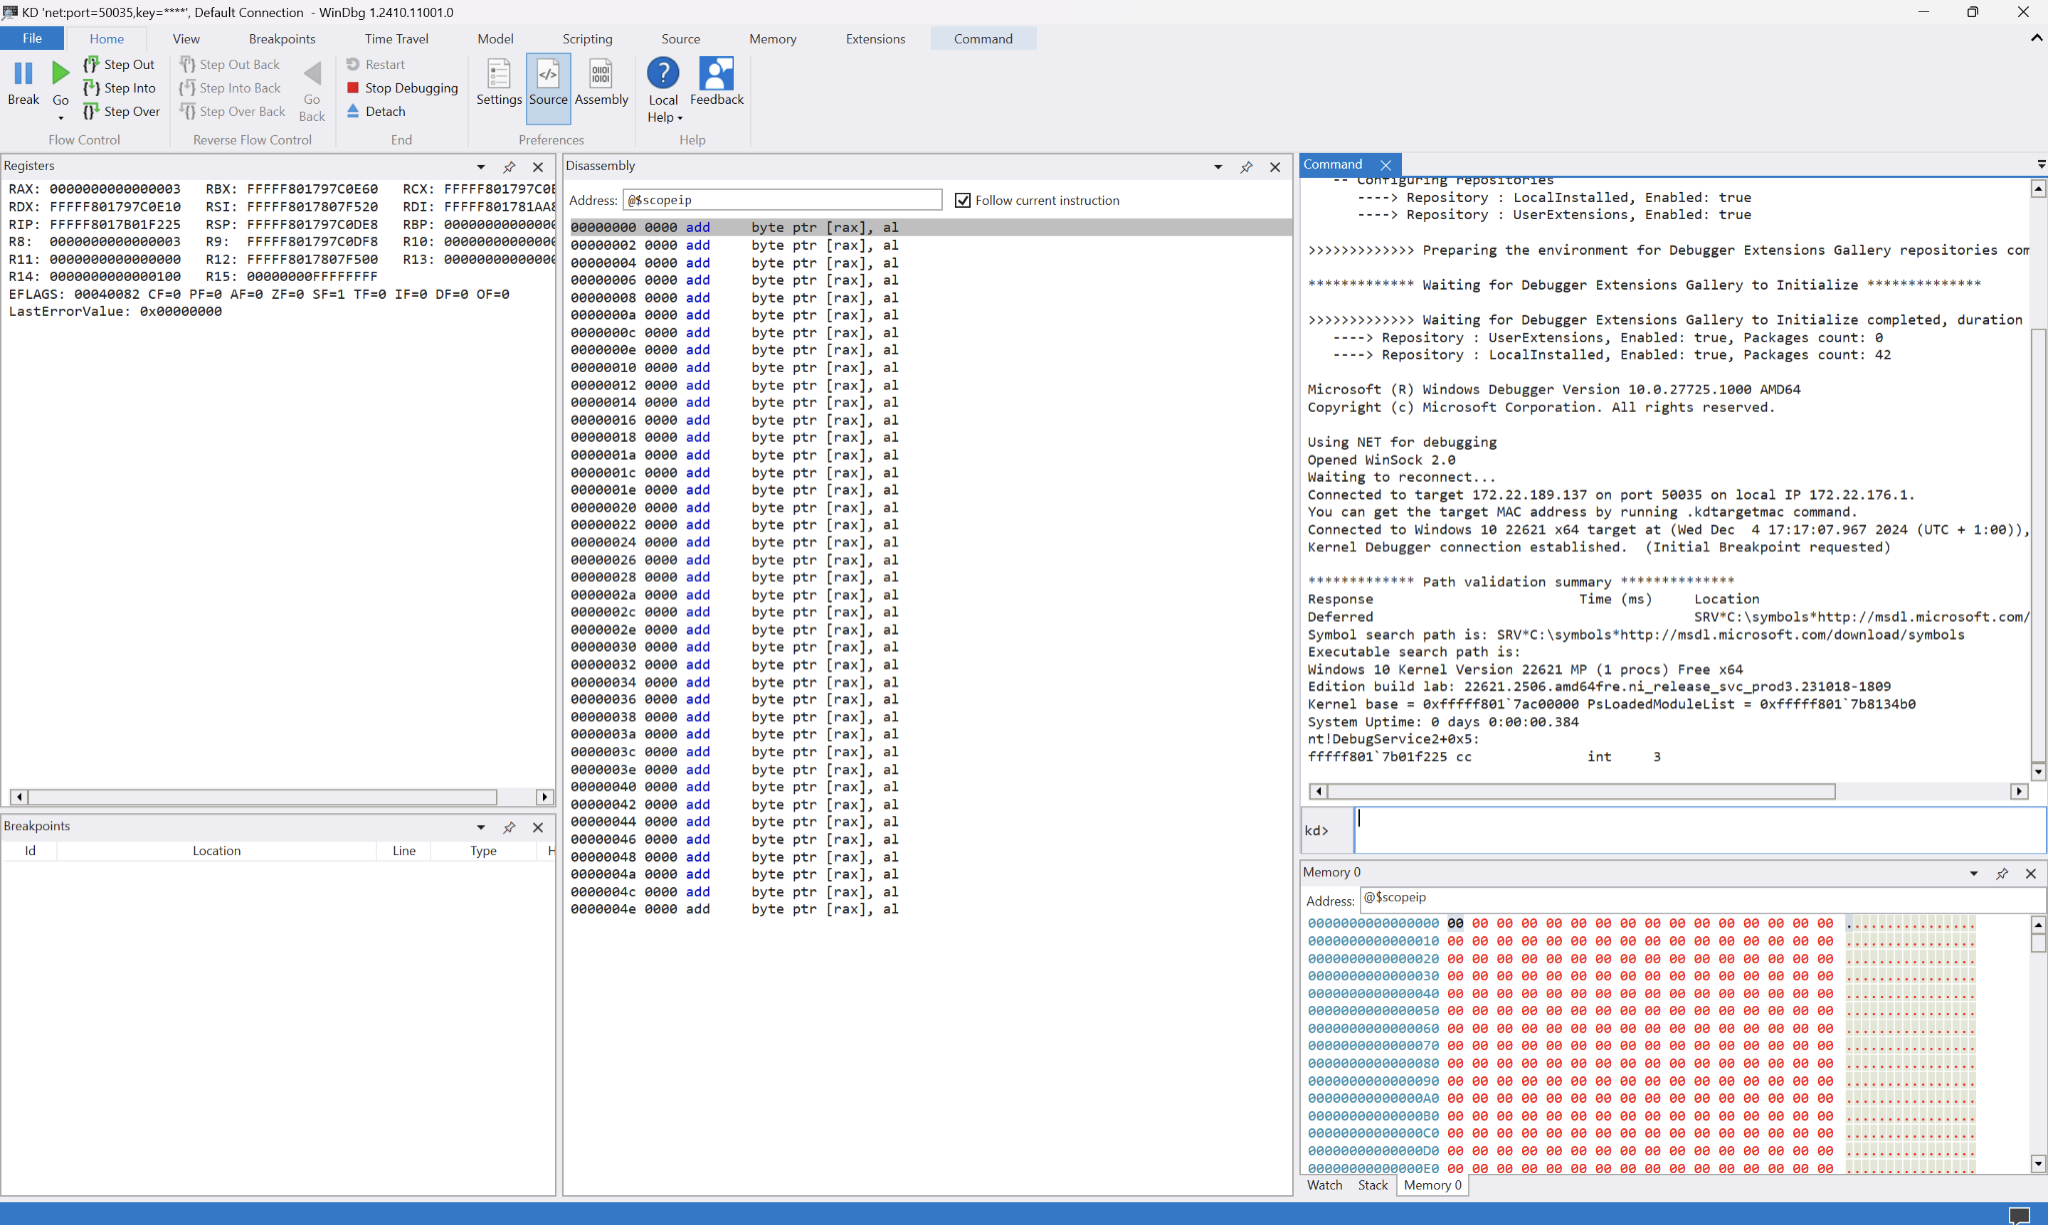
Then, while still on the host machine, run WinDbg. Select “Attach to kernel” from the menu. Under the “Net” tab, configure the port number and key (using the same configuration as when you set up KDNET) and enable “Break on connection.” Finally, reboot the guest VM. You should see under the WinDbg command tab that the kernel is correctly attached to WinDbg, and the execution is stopped.
In WinDbg, add the breakpoint to the OnDeviceControl function in the driver:bp KmdfHelloWorld!OnDeviceControl.
And resume the execution using the
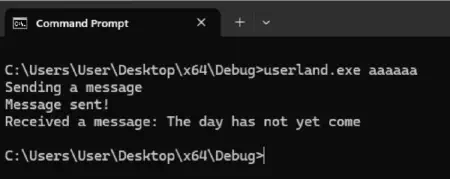
WinDbg g command. You may need to do this multiple times until you can freely use the guest VM. Then, in the guest VM, run the userland program through the command line (cmd.exe):.\userland.exe “aaaaaaaa”
The userland.exe program sends the control code to the specified device driver. When the KmdfHelloWorld!OnDeviceControl function in the Windows driver is hit, WinDbg stops the execution on the breakpoint on the mov qword ptr [rsp+8], rbx instruction.
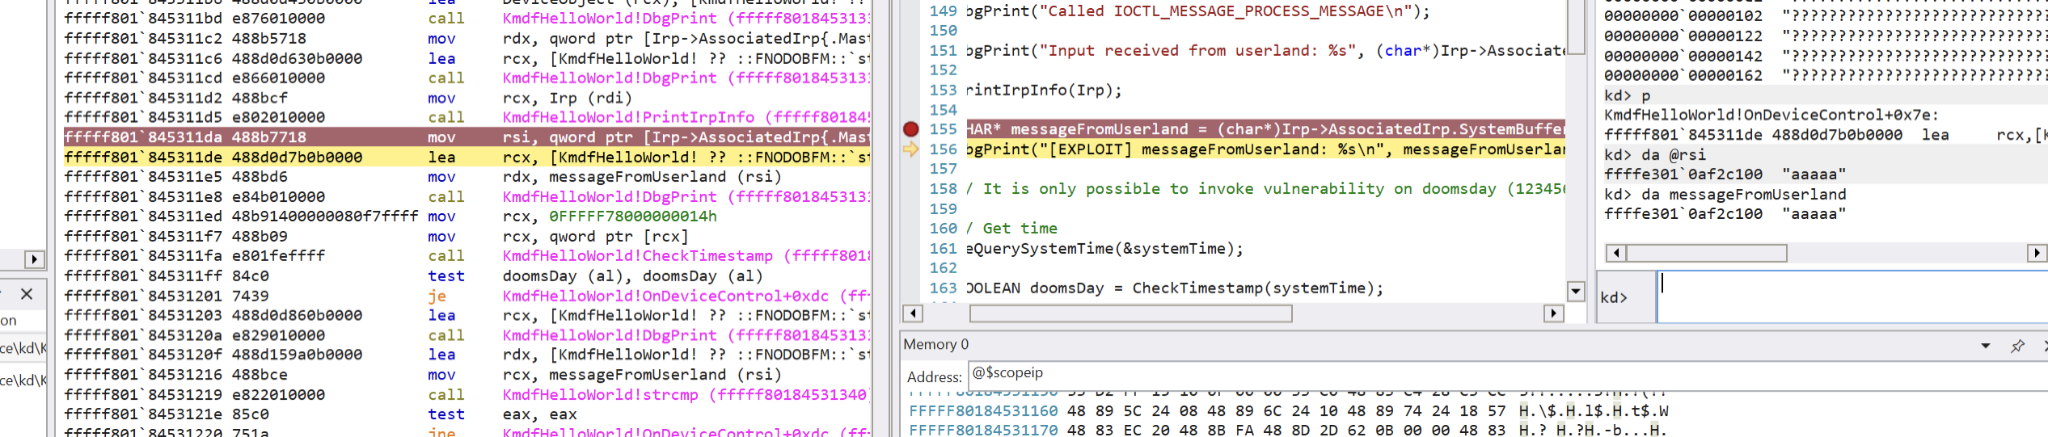
Use the Step Over command (using the F10 hotkey) to go after the following line in the source code:
CHAR* messageFromUserland = (char*)Irp->AssociatedIrp.SystemBuffer;
In the disassembly window, the above line of code is represented by the following:
mov rsi, qword ptr [Irp->AssociatedIrp{.asterIrp} (rdi+18h)
lea rcx, [KmdfHelloWorld! ?? `::FNODOBFM::`string’` (fffff80334941d60)]
mov rdx, messageFromUserland (rsi)
Based on the disassembly, we know the messageFromUserland message is pointed to by the RSI register.
In the WinDbg console, we can confirm that the provided message to the kernel is stored in the RSI register:
kd> da @rsi
fffffe301`0af2c100 “aaaaaaaa”
Or we can use this command, because we have symbols configured:
kd> da messageFromUserland
fffffe301`0af2c100 “aaaaaaaa”
And you can use the
Locals window to see the DeviceIoControl output and buffer length (Irp->CurrentStackLocation->[<Raw View>] -> Parameters -> DeviceIoControl -> OutputBufferLength and InputBufferLength).
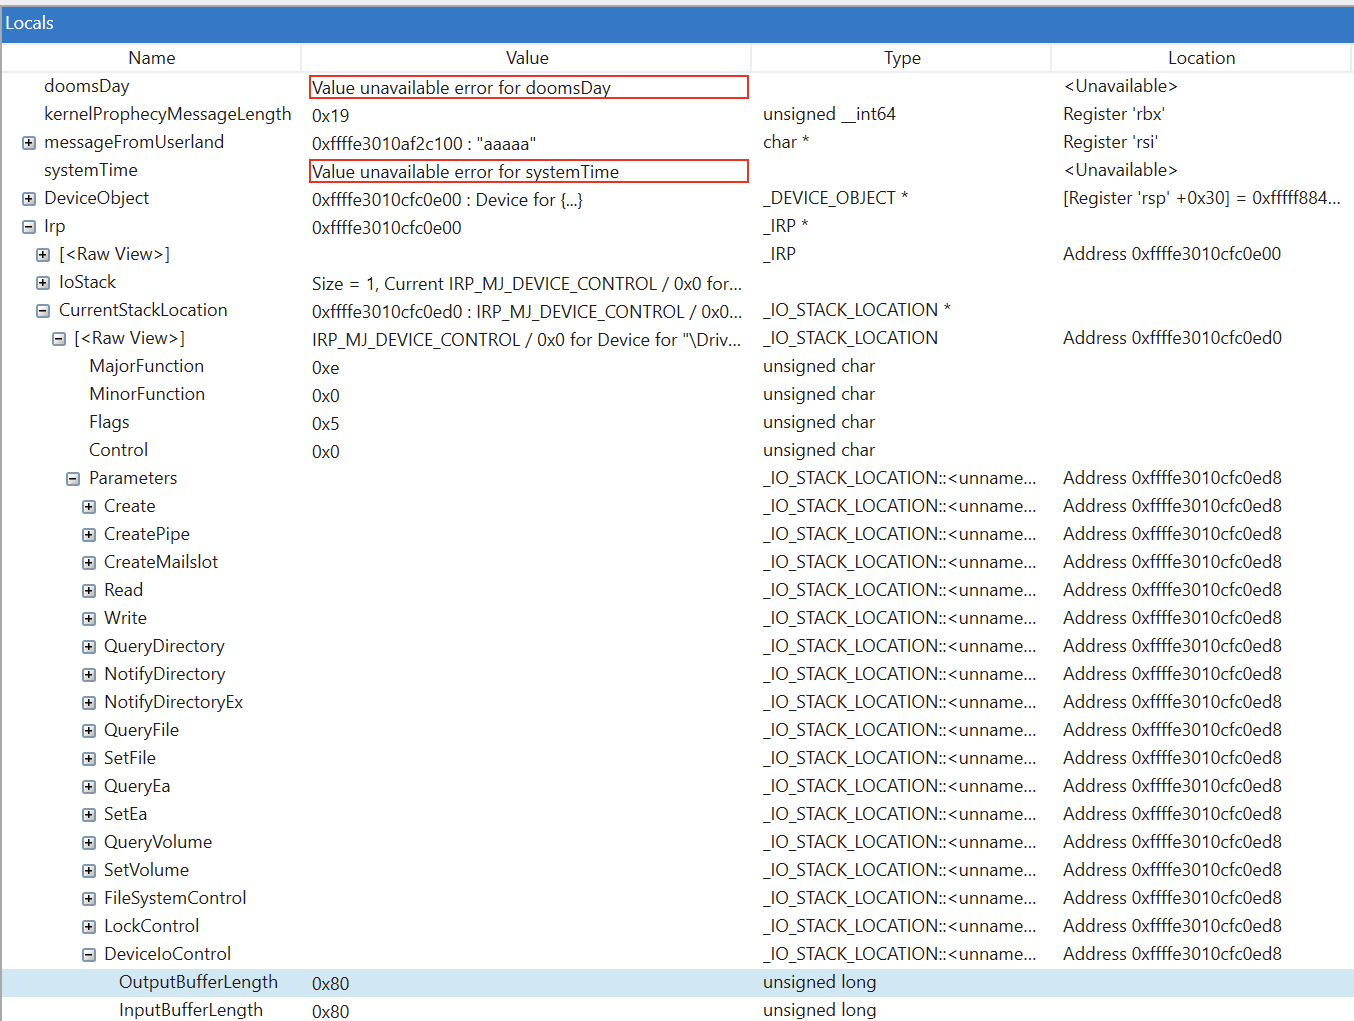
From this window, we can see that we should not extend the 0x80 buffer length when fuzzing.
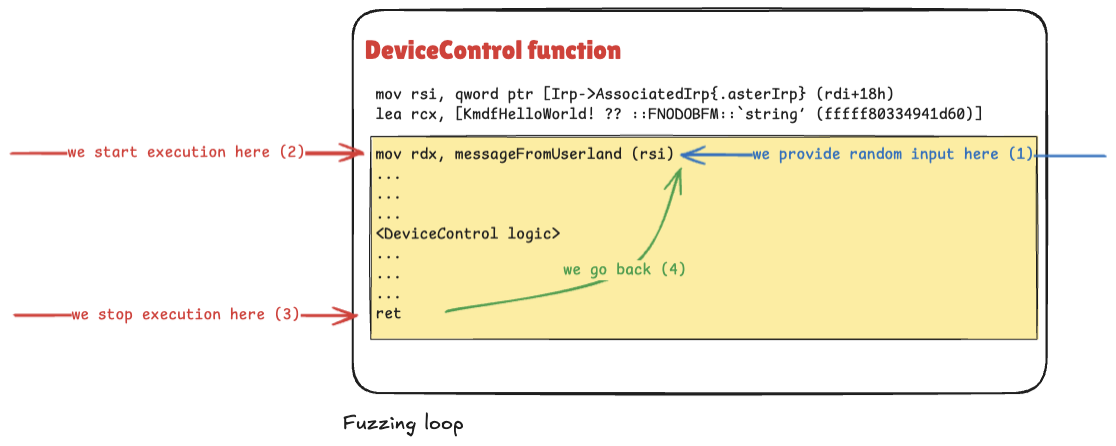
To sum up, the following diagram presents the intended fuzzing loop:
Loading the snapshot WinDbg extension #
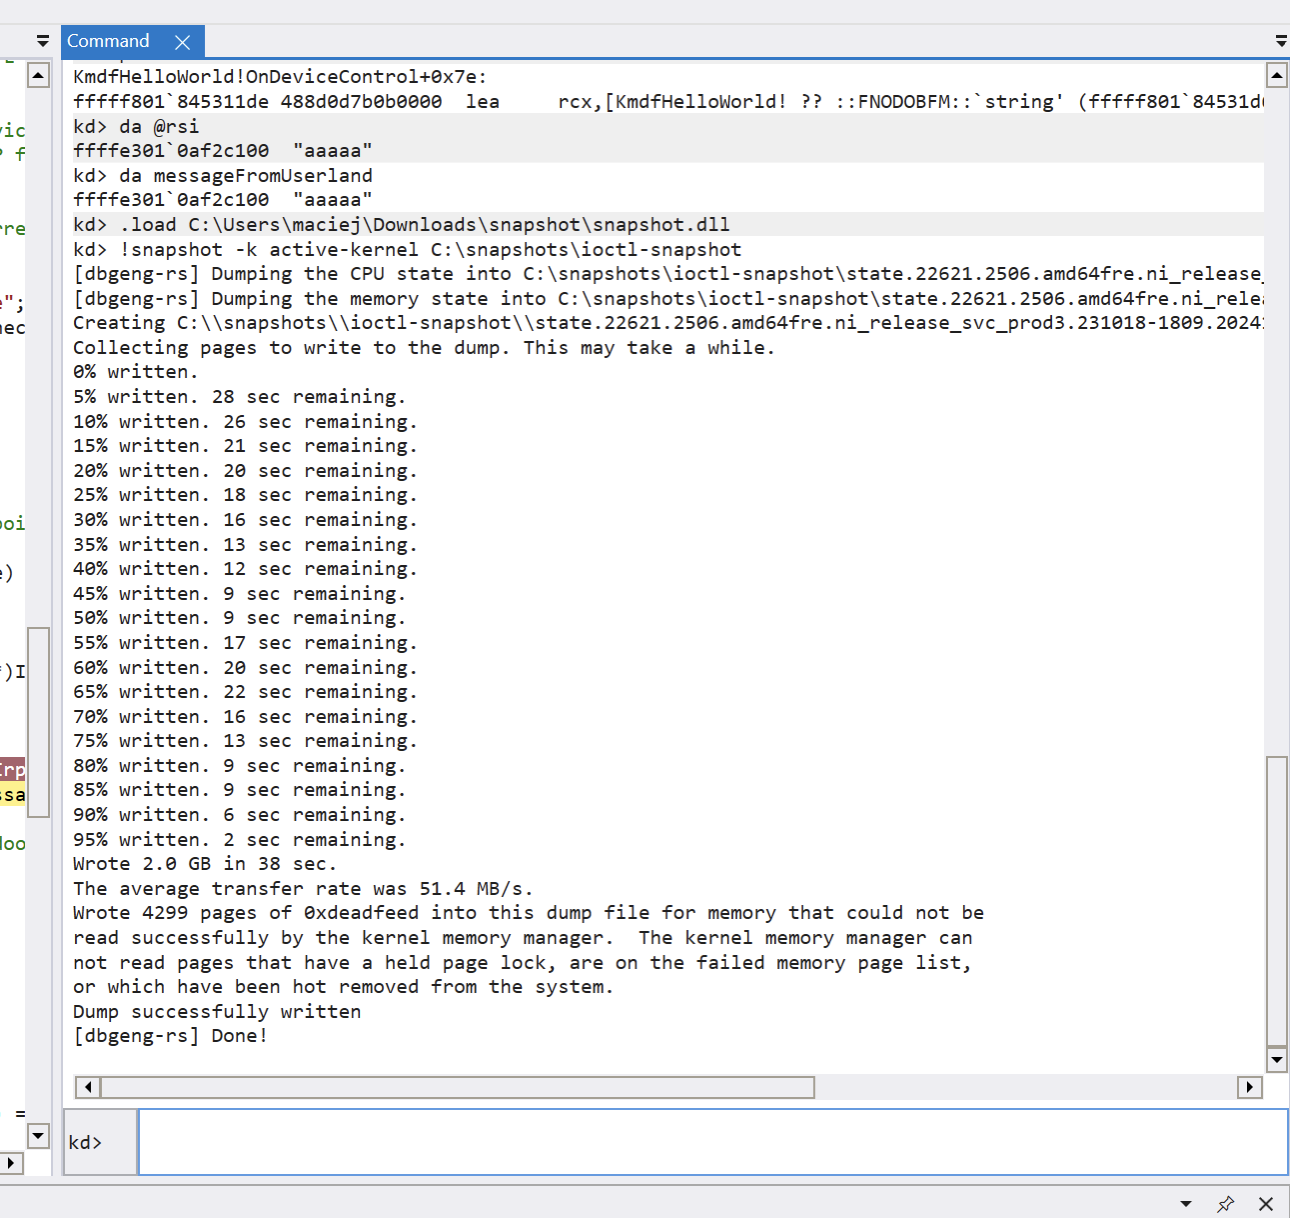
We stopped our execution before the mov rdx, messageFromUserland (rsi) instruction. To run snapshot fuzzing, we have to dump the state of the CPU (GPRs, MSRs, FPU state, segments, and so on) and the physical memory of the guest VM.
To do this, load the snapshot WinDbg extension (which was downloaded while preparing the host machine) by running the following command in WinDbg:
.load \path\to\snapshot\snapshot.dll
Then, create a directory to store your snapshot file (for example, C:\snapshots), and run the following command in WinDbg:
!snapshot -k active-kernel C:\snapshots\ioctl-snapshot
Writing a snapshot to the dump file takes around 10 minutes. You should see the Dump successfully written message.
When the snapshot is created, edit the C:\snapshots\ioctl-snapshot\regs.json file and change the
cr8 control register to 0x0 to mitigate a current known bug and prevent errors when running the wtf fuzzer (follow
this GitHub issue to keep up with future fixes for this bug).
Additionally, make note of the following function addresses, which we’ll define later when we prepare the harness’s Init function. Keep in mind that to be able easily save these addresses, you need to have PDB symbols for the specific target set up.
Remember that addresses are specific to the current session due to ASLR and will change upon system reboot or driver reload.
- CheckTimestamp function
kd> x KmdfHelloWorld!CheckTimestamp
fffff803`14a01000 KmdfHelloWorld!CheckTimestamp (union _LARGE_INTEGER)
- OnDeviceControl return address
kd> u KmdfHelloWorld!OnDeviceControl+0x131
…
fffff803`14a01291 5f pop rdi
fffff803`14a01292 c3 ret
Creating the fuzzing harness #
To create a new fuzzing harness (i.e., a fuzzer module), add the fuzzer_helloworld.cc file to the wtf/src/wtf directory. The code in the harness should insert a test case into the target, define various conditions, detect crashes, and signal the end of the test case.
Paste the content of the wtf tool’s
fuzzer_dummy.cc file into fuzzer_helloworld.cc.
- Change the name of the module and the target from
DummytoFuzzHelloWorld:
#include "backend.h"
#include "targets.h"
#include <fmt/format.h>

namespace fs = std::filesystem;

namespace FuzzHelloWorld {

bool InsertTestcase(const uint8_t *Buffer, const size_t BufferSize) {
  return true;
}

bool Init(const Options_t &Opts, const CpuState_t &) {

  //
  // Catch context-switches.
  //

  if (!g_Backend->SetBreakpoint("nt!SwapContext", [](Backend_t *Backend) {
        fmt::print("nt!SwapContext\n");
        Backend->Stop(Cr3Change_t());
      })) {
    return false;
  }

  return true;
}

//
// Register the target.
//

Target_t FuzzHelloWorld("FuzzHelloWorld", Init, InsertTestcase);

} // namespace FuzzHelloWorld
- In the
InsertTestcasefunction, add the logic to feed the fuzzing input to your target.
Bufferis a pointer to the byte array containing the fuzz input data.BufferSizerepresents the size of theBufferin bytes.
bool InsertTestcase(const uint8_t *Buffer, const size_t BufferSize) {
  if (BufferSize > 0x80) return true;

  if (!g_Backend->VirtWriteDirty(Gva_t(g_Backend->Rsi()), Buffer, BufferSize)){
  fmt::print("Writing into RSI failed!\n");
  return false;
  }

  g_Backend->PrintRegisters();
  return true;
}
If the BufferSize exceeds 0x80, the logic will pass the input to another fuzzing iteration. If it is lower than 0x80, it writes the testcase content to the buffer pointed to by the RSI register (messageFromUserland). For debugging purposes, the logic prints the registers to the console.
Keep these tips in mind while setting up the harness:
- You can access different registers by using
g_Backend->Rax(),g_Backend->Rsi(), and so on.- When you want to access a different register, use
g_Backend->R8(value)(e.g.,g_Backend->R8(BufferSize))- When you want to read part of the memory, you can use
VirtRead,VirtRead4,VirtRead8, and so on. (e.g.,g_Backend->VirtRead8(Gva_t(g_Backend->Rdx()));)Unfortunately, wtf’s back end is currently not well documented, so you’ll have to consult the source code for more hands-on functions and example harnesses (
fuzzer_hevd.cc,fuzzer_ioctl.cc,fuzzer_tlv_server.cc).
Then, prepare the
Initfunction to set up logic during fuzzing.First, we define key addresses we need to hook,
OnDeviceControl(specifically, its return address) andCheckTimestamp; we noted these earlier when we created our snapshot.
    const Gva_t OnDeviceControlEnd = Gva_t(0xfffff80314a01292);
    const Gva_t CheckTimestamp = Gva_t(0xfffff80314a01000);
Then, we set up those hooks, along with two others.
Hook #1: Bypass timestamp validation
This hook simulates a successful timestamp check by always returning true from our driver’s CheckTimestamp function (using a handy Backend->SimulateReturnFromFunction(1) function), preventing the target from rejecting our input.
Hooking various functions is extremely useful for fuzzing targets that check values such as checksums and hashes.
    if (!g_Backend->SetBreakpoint(
        CheckTimestamp,
        [](Backend_t *Backend) {
            Print("Hooking CheckTimestamp\n");
            Backend->SimulateReturnFromFunction(1); // Force return value of 1 (success)
        }
    )) {
        Print("Failed to set breakpoint: CheckTimestamp\n");
        return false;
    }
Hook #2: End of execution marker
The following breakpoint tells the fuzzer when to stop the current iteration, which is critical for properly fuzzing boundaries and avoiding infinite loops.
    if (!g_Backend->SetBreakpoint(OnDeviceControlEnd, [](Backend_t *Backend) {
        Print("Reached end!\n");
        Backend->Stop(Ok_t()); // Signal successful completion
    })) {
        Print("Failed to set breakpoint: OnDeviceControlEnd\n");
        return false;
    }
Hook #3: Context switch monitor
This hook catches context switches.
    if (!g_Backend->SetBreakpoint("nt!SwapContext", [](Backend_t *Backend) {
        fmt::print("nt!SwapContext\n");
        Backend->Stop(Cr3Change_t()); // Signal CR3 register change (page directory)
    })) {
        return false;
    }
Hook #4: Crash detection
This hook captures system crashes and collects the crashes in files.
    if (!g_Backend->SetBreakpoint("nt!KeBugCheck2", [](Backend_t *Backend) {
        // Collect all bugcheck parameters
        const uint32_t BCode = Backend->GetArg4(0);  // Bugcheck code
        const uint64_t B0 = Backend->GetArg8(1);     // Parameter 1
        const uint64_t B1 = Backend->GetArg8(2);     // Parameter 2
        const uint64_t B2 = Backend->GetArg8(3);     // Parameter 3
        const uint64_t B3 = Backend->GetArg8(4);     // Parameter 4
        const uint64_t B4 = Backend->GetArg8(5);     // Parameter 5

        // Create unique crash filename using all bugcheck parameters
        // This helps identify unique crashes and avoid duplicates
        const std::string Filename =
            fmt::format("crash-{:#x}-{:#x}-{:#x}-{:#x}-{:#x}-{:#x}",
                       BCode, B0, B1, B2, B3, B4);

        Print("KeBugCheck2: {}\n", Filename);
        Backend->Stop(Crash_t(Filename)); // Signal crash with identifying information
    })) {
        fmt::print("Failed to SetBreakpoint KeBugCheck2\n");
        return false;
    }
And here is the whole snapshot fuzzing harness:
#include "backend.h"
#include "targets.h"
#include <fmt/format.h>

namespace FuzzHelloWorld {

    template <typename... Args_t>
    void Print(const char *Format, const Args_t &...args) {
        fmt::print(Format, args...);
    }


bool InsertTestcase(const uint8_t *Buffer, const size_t BufferSize) {
    if (BufferSize > 0x80) return true;
    if(!g_Backend->VirtWriteDirty(Gva_t(g_Backend->Rsi()), Buffer, BufferSize)) {
        Print("Writing into RSI failed\n");
        return false;
    } else {
        // Print("Written {} with {:#x} size\n", Buffer, BufferSize);
    }


  return true;
}

bool Init(const Options_t &Opts, const CpuState_t &) {
    const Gva_t currentRIP = Gva_t(g_Backend->Rip()); // RIP register when doing snapshot
    const Gva_t OnDeviceControlEnd = Gva_t(0xfffff80314a01292);
    const Gva_t CheckTimestamp = Gva_t(0xfffff80314a01000);

    Print("Current RIP: {:#x}\n", currentRIP);

    // Bypass CheckTimestamp check
    if (!g_Backend->SetBreakpoint(
        CheckTimestamp,
        [](Backend_t *Backend) {
            Print("Hooking CheckTimestamp\n");
            Backend->SimulateReturnFromFunction(1);
        }
    )) {
        Print("Failed to set breakpoint: CheckTimestamp\n");
        return false;
    }

    // Stop at the end of the OnDeviceControlEnd address
    if (!g_Backend->SetBreakpoint(OnDeviceControlEnd, [](Backend_t *Backend) {
        Print("Reached end!\n");
        Backend->Stop(Ok_t());
    })) {
        Print("Failed to set breakpoint: OnDeviceControlEnd\n");
        return false;
    }

  // Catch context-switches
  if (!g_Backend->SetBreakpoint("nt!SwapContext", [](Backend_t *Backend) {
        fmt::print("nt!SwapContext\n");
        Backend->Stop(Cr3Change_t());
      })) {
    return false;
  }

  // Catch bugchecks.
  if (!g_Backend->SetBreakpoint("nt!KeBugCheck2", [](Backend_t *Backend) {
        const uint32_t BCode = Backend->GetArg4(0);
        const uint64_t B0 = Backend->GetArg8(1);
        const uint64_t B1 = Backend->GetArg8(2);
        const uint64_t B2 = Backend->GetArg8(3);
        const uint64_t B3 = Backend->GetArg8(4);
        const uint64_t B4 = Backend->GetArg8(5);
        const std::string Filename =
            fmt::format("crash-{:#x}-{:#x}-{:#x}-{:#x}-{:#x}-{:#x}", BCode, B0,
                        B1, B2, B3, B4);
        Print("KeBugCheck2: {}\n", Filename);
        Backend->Stop(Crash_t(Filename));
      })) {
    fmt::print("Failed to SetBreakpoint KeBugCheck2\n");
    return false;
  }

  return true;
}

// Register the target.
Target_t FuzzHelloWorld("FuzzHelloWorld", Init, InsertTestcase);

} // namespace FuzzHelloWorld
Harness compilation #
To compile the harness, open the
Visual Studio Developer Command Prompt, then move to the wtf\src\build directory and run the
build-release-msvc.bat script. The compilation should finish without errors, and the last line should provide you with the path to the compiled wtf binary (wtf.exe).
Each time you change the harness, you have to recompile it. Ensure the compilation finishes without any errors.
Running fuzzing #
To run fuzzing, navigate to the wtf\targets directory and create a new FuzzHelloWorld directory. Inside the FuzzHelloWorld directory, create the following directories:
inputs: This directory contains the initial seed inputs for the fuzzer. Create a randomtest.txtfile withAAAAAas an input.outputs: This directory stores the current minimal set of inputs that achieve the observed code coverage.crashes: This directory stores the inputs that cause the target to crash.state: This directory contains snapshot files. Put themem.dmpandregs.jsonfiles from theC:\snapshots\ioctl-snapshotdirectory here.
Starting a server node #
The server node keeps track of all the fuzzer states—the code coverage and corpus. It also generates and distributes the test cases to clients. Use the following command to run the server node:
C:\Users\User\wtf\targets\FuzzHelloWorld> ..\..\bin\wtf.exe master --name FuzzHelloWorld --max_len=4096
nameis the module name specified in the harness.max_lenlimits the size of the generated test case.
Running fuzzing nodes #
In another command window, use this command to run the fuzzing node. By default, the bochscpu
back end execution will be used.
C:\Users\User\wtf\targets\FuzzHelloWorld> ..\..\bin\wtf.exe fuzz --name FuzzHelloWorld
After the server node has been running for a couple of seconds, you should see the following in the master window:
Saving crash in C:\Users\User\wtf\targets\FuzzHelloWorld\crashes\crash-0x3b-0xc0000005-0xfffff80314a01233-0xfffff90641f9ec90-0x0-0x0
#7346 cov: 4667 (+4667) corp: 3 (114.0b) exec/s: 7.3/k (1 nodes) lastcov: 1.0s crash: 997 timeout: 0 cr3: 0 uptime: 5.0s
cov: This represents the current code coverage achieved by the fuzzer. It’s typically measured in basic blocks, edges, or other executed code units. A higher number indicates that more of the target’s code has been explored.corp: This refers to the size of the current corpus, which is the set of unique, interesting inputs that the fuzzer has discovered. The size value represents the number of files and the total size of all corpus files.exec/s: This is the speed at which the fuzzer is executing test cases. It measures how many inputs the fuzzer can process per second across all nodes. Higher numbers generally indicate better performance.lastcov: This represents the time since the last new coverage was discovered.crash: This is the number of unique crashes discovered by the fuzzer.
You should iteratively add fuzzing nodes based on the hardware resources available, target complexity, and fuzzing strategy.
And this is what the crashing input might look like:
C:\Users\User\wtf\targets\FuzzHelloWorld> type crashes\crash-0x3b-0xc0000005-0xfffff80314a01233-0xfffff90641f9ec90-0x0-0x0
DEADBEEFf
Triaging crashes #
Refer to the standard wtf documentation for generating different types of traces:
- Generating execution traces (simple text-based traces)
- To have symbolized execution traces, use
symbolizer-rsand the--import-pdbsflag to import theKmdfHelloWorld.pdbfile into the symbol cache
- To have symbolized execution traces, use
- Generating Tenet traces (visual traces loadable into IDA with Tenet)
- Generating code-coverage traces (visual coverage loadable into IDA with Lighthouse)
Execution back ends #
The execution back end used in the above example is based on bochscpu. See the comparison of different execution back ends supported by wtf. Consider using the KVM back end to speed up long executions. Also note that even though the presented fuzzing approach was demonstrated on Windows, snapshot fuzzing provides a convenient way to scale fuzzing nodes on a Linux machine as well.