Coverage analysis #
Gaining confidence in your code coverage archived during fuzzing is essential for two reasons. Firstly, you want to assess which parts of your applications your fuzzing harnesses execute.
For example, a magic value check, like the one shown in the following figure, may be hard for a fuzzer to overcome. Discovering such a check is important so that the values can be provided to the fuzzer through a dictionary or test cases in the seed corpus.
if (buf == 0x7F454C46) {
    // start parsing buf
}
Secondly, when switching your fuzzer or updating your harness or SUT, you want to see whether coverage changes. If coverage decreases, then you may need to extend your harness because new features were introduced. If coverage increases, then you probably improved your harness or the SUT became easier to fuzz.
Fuzzing coverage is a proxy for the capability and performance of the fuzzer. Even though it is widely accepted that coverage is not ideal for measuring the performance of a fuzzing engine, coverage can tell you whether your harness works in a given setup.
The following flow chart shows an ideal coverage analysis workflow. The workflow uses the corpus generated after each fuzzing campaign to calculate the coverage, which is the preferred method.
PRO TIP: You should not use the statistics returned by your specific fuzzer to track fuzzing performance over a long time. For example, AFL++ outputs a value that indicates the code coverage. However, this value is non-comparable with other fuzzers because they may calculate this value differently.
The most comparable data is generated by tools specifically made for measuring coverage.
The following section reviews two methods to generate coverage reports: an LLVM-based instrumentation and a GCC-based one. LLVM offers a stable and very fast way to generate coverage reports. The LLVM toolkit supports the SanitizerCoverage instrumentation that is unique to Clang and the GCC-compatible gcov instrumentation. GCC only supports the gcov instrumentation.
Both methods allow the generation of a clear representation of coverage, with the resulting HTML report consisting of multiple pages. However, the report generation with gcov output is more inefficient and requires more time compared to the LLVM one.
Code coverage using LLVM’s SanitizerCoverage #
The LLVM project provides the SanitizerCoverage interface and tooling to allow coverage data collection. The default instrumentation by libFuzzer or AFL++ uses this API during fuzzing to guide the fuzzer toward uncovering more code.
The same LLVM feature can be used to analyze the coverage of a fuzzing corpus. In this section, we describe how to:
- Build your project for gathering coverage data, independent of the fuzzer you used to generate the corpus
- Rerun your binary on the fuzzing corpus
- Convert data to an HTML report
We start by defining a custom runtime called execute-rt.cc. This runtime provides a main function that executes an existing corpus.
#include <stdio.h>
#include <stdlib.h>
#include <dirent.h>
#include <string.h>
#include <stdint.h>

extern "C" int LLVMFuzzerTestOneInput(const uint8_t *data, size_t size);

void load_file_and_test(const char *filename) {
    FILE *file = fopen(filename, "rb");
    if (file == NULL) {
        printf("Failed to open file: %s\n", filename);
        return;
    }

    fseek(file, 0, SEEK_END);
    long filesize = ftell(file);
    rewind(file);

    uint8_t *buffer = (uint8_t*) malloc(filesize);
    if (buffer == NULL) {
        printf("Failed to allocate memory for file: %s\n", filename);
        fclose(file);
        return;
    }

    long read_size = (long) fread(buffer, 1, filesize, file);
    if (read_size != filesize) {
        printf("Failed to read file: %s\n", filename);
        free(buffer);
        fclose(file);
        return;
    }

    LLVMFuzzerTestOneInput(buffer, filesize);

    free(buffer);
    fclose(file);
}

int main(int argc, char **argv) {
    if (argc != 2) {
        printf("Usage: %s <directory>\n", argv[0]);
        return 1;
    }

    DIR *dir = opendir(argv[1]);
    if (dir == NULL) {
        printf("Failed to open directory: %s\n", argv[1]);
        return 1;
    }

    struct dirent *entry;
    while ((entry = readdir(dir)) != NULL) {
        if (entry->d_type == DT_REG) {
            char filepath[1024];
            snprintf(filepath, sizeof(filepath), "%s/%s", argv[1], entry->d_name);
            load_file_and_test(filepath);
        }
    }

    closedir(dir);
    return 0;
}
The following compilation command creates an instrumented binary that can output coverage information.
clang++ -DNO_MAIN -O2 -fprofile-instr-generate -fcoverage-mapping main.cc harness.cc execute-rt.cc -o fuzz_exec
Similarly to the example in
the libFuzzer section, we need to disable the default main function. We also need to disable optimizations to make the coverage calculation more precise. The resulting binary outputs coverage data when executed. The first parameter of the resulting binary is a directory with test cases. The following command generates a fuzz.profraw file.
LLVM_PROFILE_FILE=fuzz.profraw ./fuzz_exec corpus/
The .profraw file must now be converted to an indexed .profdata file. Make sure to have the required LLVM tools installed. On Debian/Ubuntu, the package is called llvm (e.g., apt install llvm).
llvm-profdata merge -sparse fuzz.profraw -o fuzz.profdata
With access to the coverage binary fuzz_exec and a .profdata file, we can generate a report. We ignore the harness and execution runtime because we are uninterested in their coverage.
llvm-cov report ./fuzz_exec -instr-profile=fuzz.profdata -ignore-filename-regex='harness.cc|execute-rt.cc'
The output shows for each file and the total coverage.
Filename       Regions    Missed Regions     Cover   Functions  Missed Functions  Executed       Lines      Missed Lines     Cover    Branches   Missed Branches     Cover
--------------------------------------------------------------------------------------------------------------------------------------------------------------------------
/root/main.cc       13                13     0.00%           1                 1     0.00%           9                 9     0.00%          12                12     0.00%
--------------------------------------------------------------------------------------------------------------------------------------------------------------------------
TOTAL               13                13     0.00%           1                 1     0.00%           9                 9     0.00%          12                12     0.00%
A more detailed text-based output can be generated when using llvm-cov show instead of llvm-cov report. The output can be filtered by appending prefixes of filenames. For example, the following command prints the output for only the main.cc file.
llvm-cov show ./fuzz_exec -instr-profile=fuzz.profdata -ignore-filename-regex='harness.cc|execute-rt.cc' /root/main.cc
The corpus currently covers all lines except for the abort() statement, as shown in the next figure.
 1       |#include <stdlib.h>
 2       |#include <string.h>
 3       |
 4      3|void check_buf(char *buf, size_t buf_len) {
 5      3|    if(buf_len > 0 && buf[0] == 'a') {
 6      3|        if(buf_len > 1 && buf[1] == 'b') {
 7      1|            if(buf_len > 2 && buf[2] == 'c') {
 8      0|                abort();
 9      0|            }
10      1|        }
11      3|    }
12      3|}
The additional parameter -format=html -output-dir fuzz_html/ outputs the same information as HTML. It is important to set an output directory, or else the output will be a single HTML file:
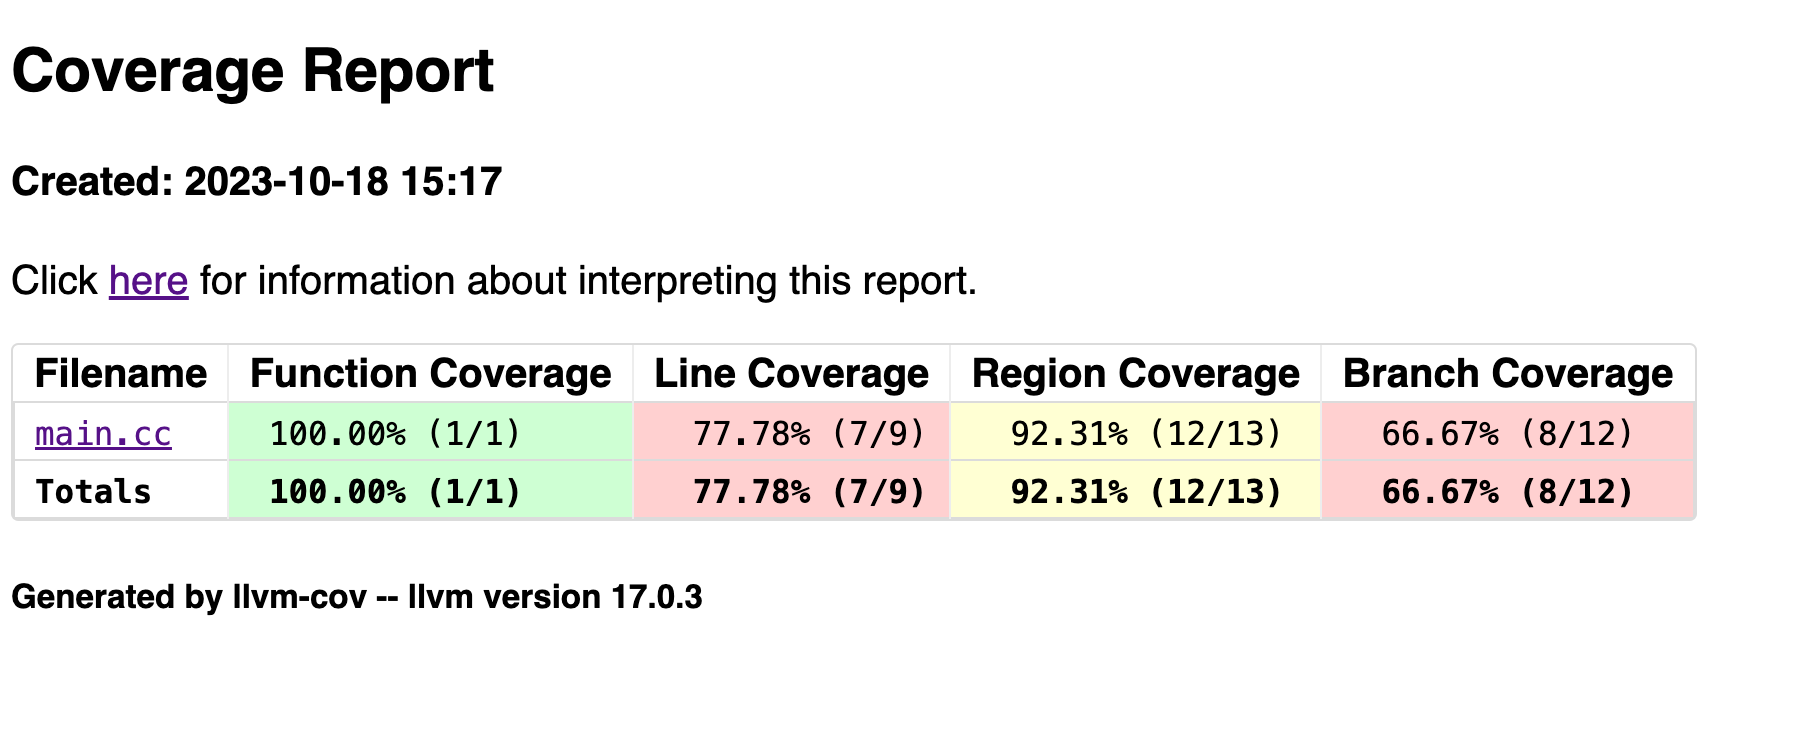
llvm-cov show ./fuzz_exec -instr-profile=fuzz.profdata -ignore-filename-regex='harness.cc|execute-rt.cc' /root/main.cc -format=html -output-dir fuzz_html/

llvm-covPRO TIP: Version 18 of LLVM and Clang can generate index pages for each directory, so that the root page of the report is not filled with hundreds of individual files. Simply append the flags-format=html,-output-dir fuzz_html/and-show-directory-coveragewhen invokingllvm-cov show.
Note: Generating coverage data is impossible if your corpus contains inputs that crash. Generating coverage data is possible only if the SUT exits gracefully. Ideally, fix the bugs and then rerun the fuzzer to gather coverage data. That way you can gather coverage data for previously crashing inputs.
Alternatively, filter out crashing inputs manually or automatically. Another way might be to fork() the process before executing the SUT (i.e., before calling LLVMFuzzerTestOneInput).
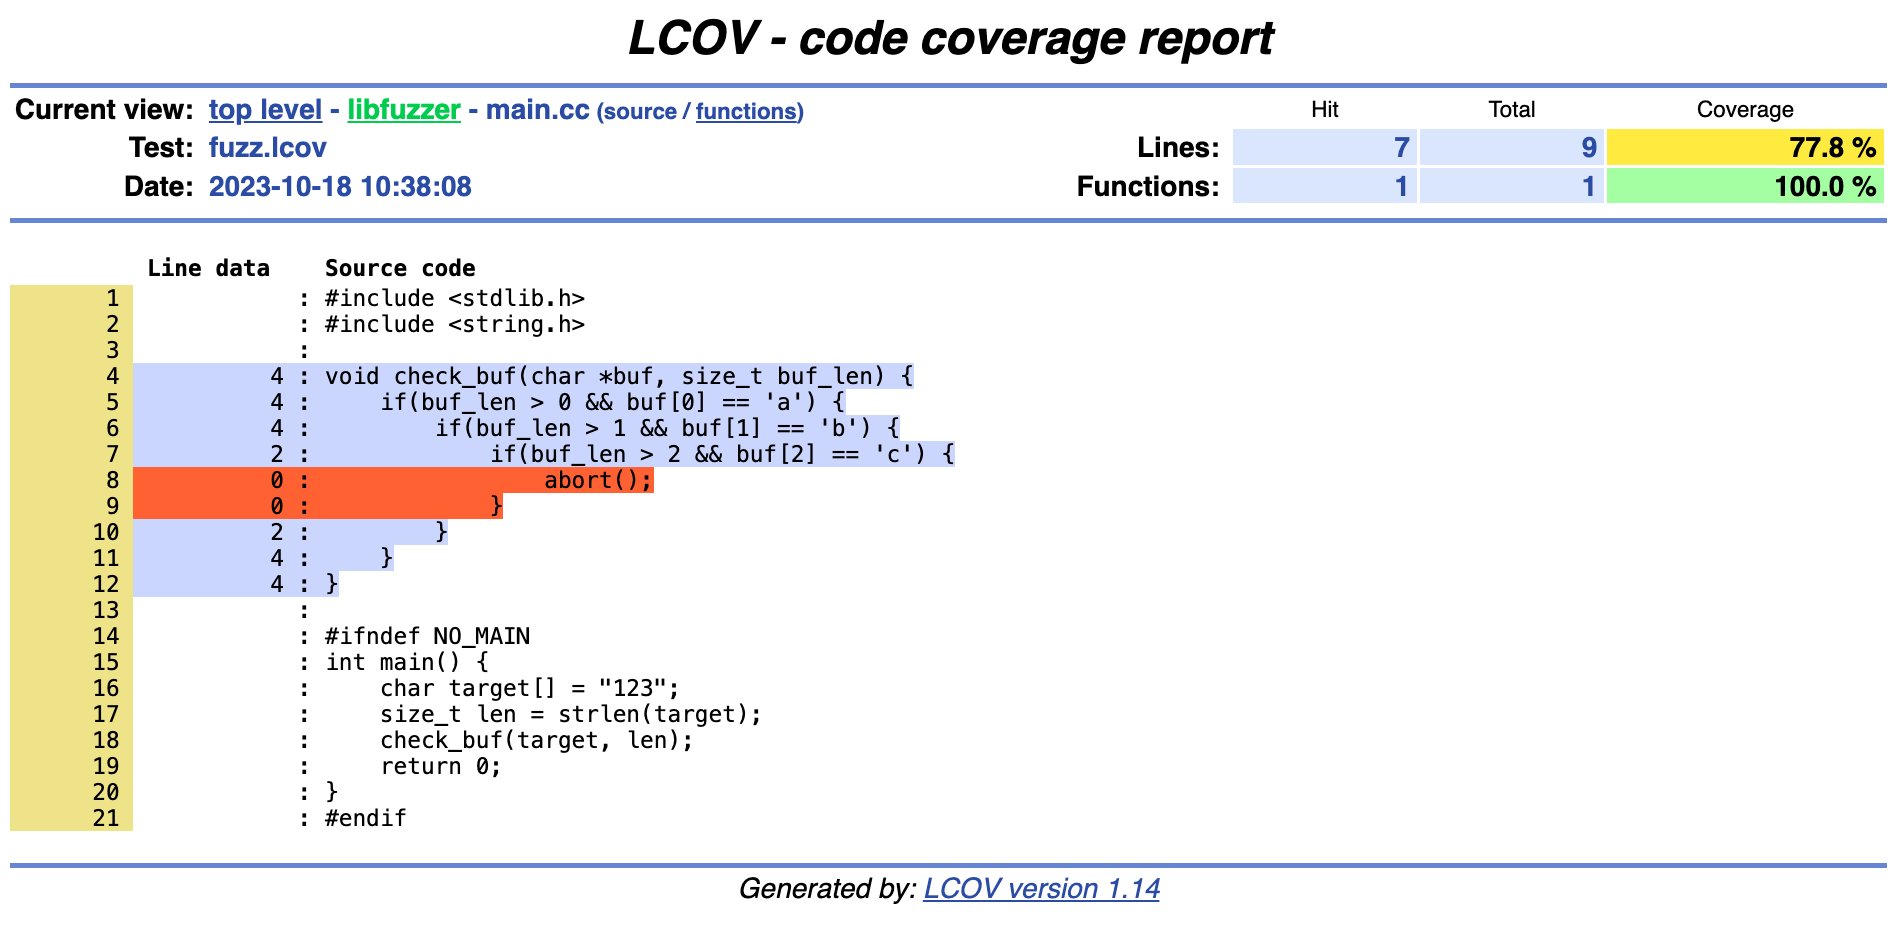
If you want to generate an HTML report using the LLVM stack, then we recommend exporting to the lcov format and then using the lcov tool to generate an HTML page. Using lcov, you can generate a per-source-file report, which is not possible with LLVM before version 18.
llvm-cov export ./fuzz_exec -instr-profile=fuzz.profdata -ignore-filename-regex='harness.cc|execute-rt.cc' -format=lcov > fuzz.lcov

apt install lcov
genhtml --output-directory fuzz_html/ fuzz.lcov
The resulting HTML is stored in the fuzz_html/ directory.

Code coverage using gcov and gcovr #
The
gcov instrumentation is provided by both GCC and LLVM. Using gcov, we can use the excellent
gcovr tool to generate HTML reports. If using LLVM, the GCC instrumentation can be added using the flags -ftest-coverage and -fprofile-arcs. Using the
execute-rt.cc runtime from the previous section, we can compile the coverage binary.
clang++ -DNO_MAIN -O2 -ftest-coverage -fprofile-arcs main.cc harness.cc execute-rt.cc -o fuzz_exec_gcov
The same compilation instruction is also valid for GCC. In this case, replace clang++ with g++.
During compilation, .gnco files are created for each object file. During execution, .gnca files are created or updated for each object file. The environment variables GCOV_PREFIX and GCOV_PREFIX_STRIP can be used to copy files across (see
here for more information). For every invocation of the binary, the .gnca files are incrementally updated. This means that executing the program over and over without removing old .gnca files will continuously increment hit counters. The gcovr tool simplifies the handling of these files.
The first step is to execute the coverage binary on an existing corpus.
./fuzz_exec_gcov corpus/
We now make sure that gcovr is installed. We recommend installing gcovr through Python’s pip because distribution versions could be outdated. If you use LLVM/Clang 14 or above, at least gcovr 5.1 is required (the version 5.1 contains this patch).
python3 -m venv venv
source venv/bin/activate
pip3 install gcovr
A text report for the whole repository can be generated using the just-installed tool. We also exclude non-relevant files:
gcovr --gcov-executable "llvm-cov gcov" --exclude harness.cc --exclude execute-rt.cc --root .
We must tell gcovr to use the LLVM gcov version and not the GCC one. The same command can also be used if you compiled your coverage binary with GCC; simply omit the --gcov-executable flag. We also exclude the harness and our execution runtime from the report.
This will return the following data:
------------------------------------------------------------------------------
                           GCC Code Coverage Report
Directory: .
------------------------------------------------------------------------------
File                                       Lines    Exec  Cover   Missing
------------------------------------------------------------------------------
main.cc                                        9       8    88%   10
------------------------------------------------------------------------------
TOTAL                                          9       8    88%
------------------------------------------------------------------------------
The same data can also be outputted in JSON by adding the --json flag. An HTML report can be generated by appending --html-details -o coverage.html:
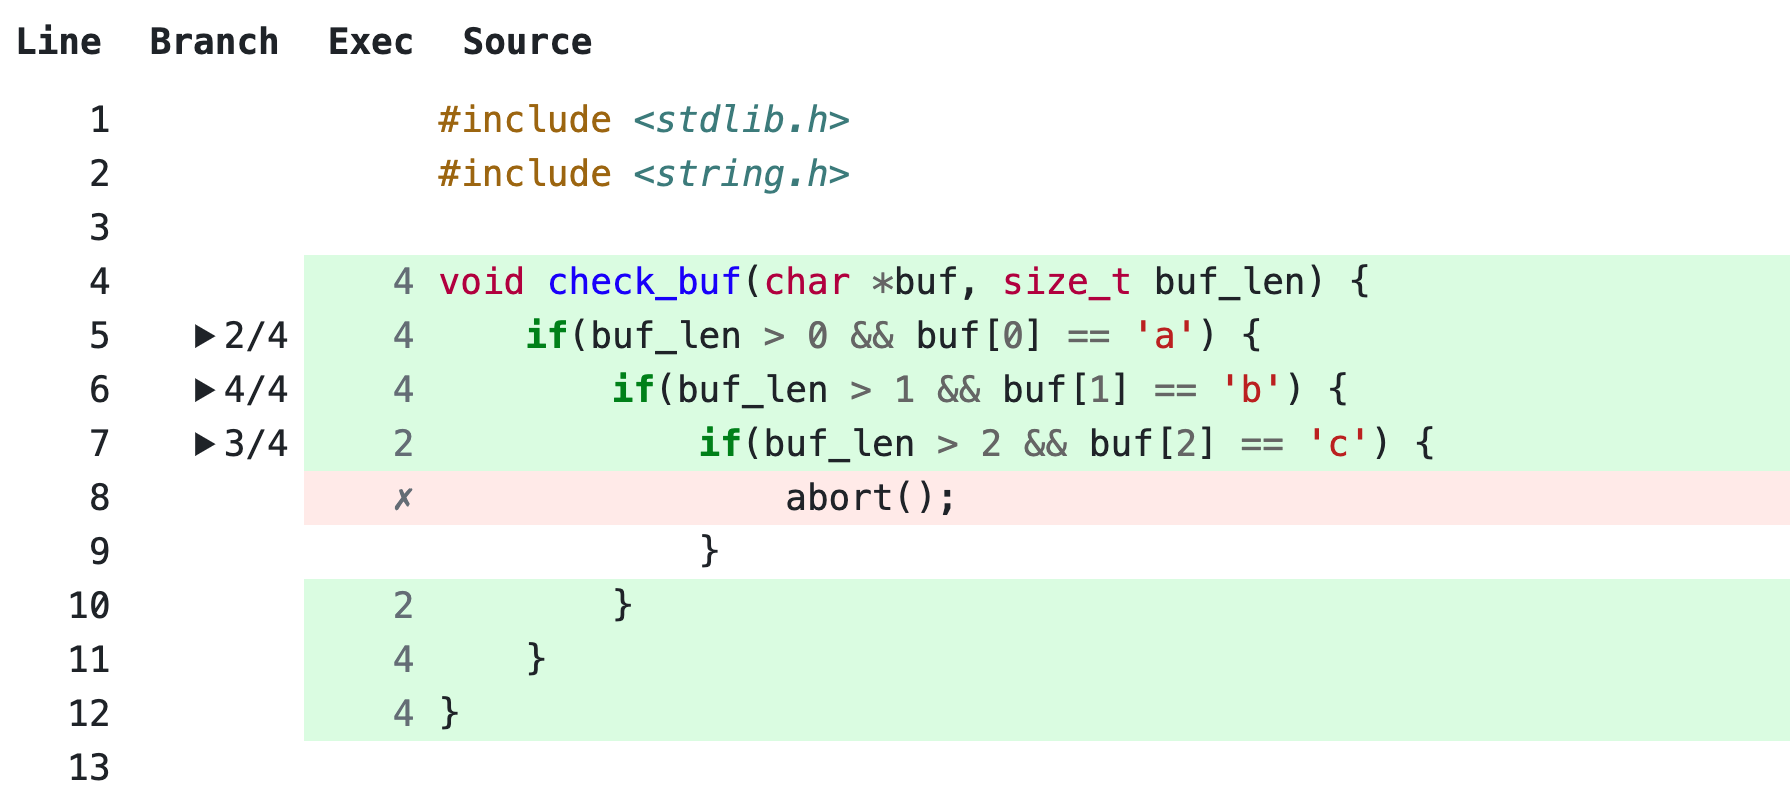
gcovr --gcov-executable "llvm-cov gcov" --exclude harness.cc --exclude execute-rt.cc --root . --html-details -o coverage.html
PRO TIP: The next version of gcovr (version 6.1) will include modern themes for a more pleasant reviewing experience. If you use the master version (pip3 install git+https://github.com/gcovr/gcovr.git), you can already enjoy the theme by adding the--html-theme github.greenflag.
The output of the HTML report shows the hit counts as well as missed lines:
We already mentioned that gcov incrementally updates .gcda files over multiple runs of the coverage binaries. To start from scratch, you can manually delete all .gcda files after executing gcovr, or add the flag --delete.
Real-world examples #
libpng #
We fuzzed libpng with libFuzzer and AFL++ in previous sections. We now want to determine the strength of our fuzzing by analyzing its coverage.
First we inspect the corpus and verify that we have test cases available by counting them.
ls corpus | wc -l
Similarly to how we configured libpng for libFuzzer and AFL++, we now configure it differently with the goal of generating a coverage report using LLVM.
export CC=clang CFLAGS="-fprofile-instr-generate -fcoverage-mapping" # Set C compiler and its flags for generating coverage
export CXX=clang++ CXXFLAGS="$CFLAGS" # Set C++ compiler and use C flags
./configure --enable-shared=no --disable-tools # Configure to compile a static library
make # Run compilation
Note that, depending on your fuzzing environment, you may need to install missing dependencies such that the compilation succeeds. For example, on a plain installation of Ubuntu, you may need to install the package zlib1g-dev as described above.
We disabled the libpng tools using the --disable-tools flag because they cause compilation issues.
To create a binary that outputs coverage data, we first prepare the same harness used during fuzzing.
curl -O https://raw.githubusercontent.com/glennrp/libpng/f8e5fa92b0e37ab597616f554bee254157998227/contrib/oss-fuzz/libpng_read_fuzzer.cc
Now, we link together the instrumented libpng, the harness, and the execution runtime.
$CXX $CFLAGS libpng_read_fuzzer.cc .libs/libpng16.a execute-rt.cc -lz -o fuzz_exec
Finally, we are able to execute the test cases and specify where data should be stored.
LLVM_PROFILE_FILE=fuzz.profraw ./fuzz_exec corpus/
The .profraw file must now be converted to an indexed .profdata file.
llvm-profdata merge -sparse fuzz.profraw -o fuzz.profdata
With access to the coverage binary fuzz_exec and a .profdata file, we can generate a report. We ignore the harness and execution runtime because we are uninterested in their coverage.
llvm-cov report ./fuzz_exec -instr-profile=fuzz.profdata -ignore-filename-regex='libpng_read_fuzzer.cc|execute-rt.cc'
To generate an HTML report, use:
llvm-cov show ./fuzz_exec -instr-profile=fuzz.profdata -ignore-filename-regex='libpng_read_fuzzer.cc|execute-rt.cc' -format=html -output-dir fuzz_html/
Generate code coverage using GCC #
For demonstration purposes, we now show how to do the same using GCC. Again we configure libpng to use a specific compiler and compilation flags.
export CC=gcc CFLAGS="-ftest-coverage -fprofile-arcs" # Set C compiler and its flags for generating coverage
export CXX=g++ CXXFLAGS="$CFLAGS" # Set C++ compiler and use C flags
./configure --enable-shared=no --disable-tools # Configure to compile a static library
make # Run compilation
Now, we can link everything together.
$CXX $CFLAGS libpng_read_fuzzer.cc .libs/libpng16.a execute-rt.cc -lz -o fuzz_exec_gcov
Finally, we can execute the existing corpus. The coverage data will be written alongside the object files.
./fuzz_exec_gcov corpus/
Using gcovr, we can generate an HTML report:
gcovr --exclude libpng_read_fuzzer.cc --exclude execute-rt.cc --root . --gcov-ignore-errors=no_working_dir_found
Note that we had to ignore an error using the flag --gcov-ignore-errors=no_working_dir_found. This might not be needed for your use case.
CMake-based project #
Let’s assume we fuzzed the CMake project with libFuzzer and AFL++ and now want to adjust it to generate coverage. The following figure shows a CMakeLists file that defines an executable called buggy_program. Alongside the main binary, a fuzzing binary is defined. Additionally, a binary that can execute existing fuzz test cases is added.
project(BuggyProgram)
cmake_minimum_required(VERSION 3.0)

add_executable(buggy_program main.cc)

add_executable(fuzz main.cc harness.cc)
target_compile_definitions(fuzz PRIVATE NO_MAIN=1)
target_compile_options(fuzz PRIVATE -g -O2 -fsanitize=fuzzer)
target_link_libraries(fuzz -fsanitize=fuzzer)

add_executable(fuzz_exec main.cc harness.cc execute-rt.cc)
target_compile_definitions(fuzz_exec PRIVATE NO_MAIN)
target_compile_options(fuzz_exec PRIVATE -O2 -fprofile-instr-generate -fcoverage-mapping)
target_link_libraries(fuzz_exec -fprofile-instr-generate)
The project can be built using the following commands:
cmake -DCMAKE_C_COMPILER=clang -DCMAKE_CXX_COMPILER=clang++ .
cmake --build . --target fuzz_exec
We can now run the fuzz_exec binary on an existing corpus and generate coverage data. Finally, we can generate a report using the binary. Refer to the libpng real-world example from the previous section for more detailed instructions.
LLVM_PROFILE_FILE=fuzz.profraw ./fuzz_exec corpus/
llvm-profdata merge -sparse fuzz.profraw -o fuzz.profdata
llvm-cov report ./fuzz_exec -instr-profile=fuzz.profdata -ignore-filename-regex='libpng_read_fuzzer.cc|execute-rt.cc'