AFL++ #
The AFL++ fuzzer is a fork from the AFL fuzzer. It offers better fuzzing performance and more advanced features while still being a very stable alternative to libFuzzer. A major benefit over libFuzzer is that AFL++ has stable support for running fuzzing campaigns on multiple cores (see Multi-core fuzzing).
This section of the Testing Handbook is based on fuzzing binaries written in C/C++ on Ubuntu on x64_64. AFL++ supports different environments like macOS, but there are caveats. If you only have a macOS computer, we recommend fuzzing on a local x86_64 VM or renting one on DigitalOcean, AWS, Hetzner, etc to simplify the setup.
Installation #
The AFL++ fuzzer has many dependencies, such as LLVM, Python, and Rust. We recommend using a current Debian or Ubuntu distribution for fuzzing with AFL++ because these are thoroughly tested distributions. Note that if you use a precompiled version of AFL++ then you are bound to the Clang and GCC versions that were used during the compilation of AFL++. The following table gives an overview of installation methods along with the supported compiler versions.
| Method | When should I use it? | Supported compiler versions (afl-clang-fast/afl-gcc --version) |
| From Ubuntu/Debian repositories |
|
|
| Docker (from Docker Hub) |
| As of writing for version 4.35c of the image Clang 19 & GCC 11 |
| Docker (from source) |
| Configurable in the Dockerfile. |
| From source |
| Adjustable by setting the environment variable
LLVM_CONFIG for example to llvm-config-18. |
Ubuntu #
If you run a recent Debian or Ubuntu version, the packaged version in the official Ubuntu repositories is an easy choice. At the time of writing, Ubuntu 23.10 packages AFL++ 4.08c and Debian 12 version 4.04c. Note that this will limit you to the Clang version supported by the packaged AFL++ version.
Note: Check which Clang version AFL++ uses on your distribution before installing lld. Run afl-cc --version to verify, then install the matching lld version (e.g., lld-17).
apt install afl++ lld-17
Installing the lld package is required for the optional LTO mode that we will describe later. Depending on the Clang version AFL++ uses on your Linux distributions, you may want to install a specific version of lld like lld-17. Verify the output of afl-cc --version.
Docker (from Docker Hub) #
If you want to use the latest stable version of AFL++, then pull the image from Dockerhub by referencing one of the Git tags.
docker pull aflplusplus/aflplusplus:stable
If you prefer to use a specific version, then replace stable with for example 4.08c.
Docker (from source) #
Alternatively, it is possible to clone a specific Git tag and then build locally using Docker.
git clone --depth 1 --branch stable https://github.com/AFLplusplus/AFLplusplus
cd AFLplusplus
docker build -t aflplusplus
If you prefer to use a specific version, then replace stable with, for example, 4.08c.
From source #
If you prefer compiling from source, refer to the Dockerfile for documentation about which Ubuntu version to use and which dependencies are required.
We now create a wrapper script that runs a command on the host or Docker for simplicity.
For Docker, we launch an ephemeral container, which means that the container is automatically removed after execution. It also mounts the current working directory at the path /src inside the container. We also disable seccomp by using --privileged for improved fuzzing performance, as
recommended by the AFL++ authors. Finally, we also give the processes running in the container full root privileges. Review the comments at the end of this section about security concerns. Avoid running this script on your development laptop. Instead, use a dedicated fuzzing virtual machine.
Create the following script with the name afl++.sh and make it executable.
cat <<'EOF' > ./afl++
#!/bin/sh
AFL_VERSION="${AFL_VERSION:-"stable"}"
case "$1" in
   host)
        shift
        bash -c "$*"
        ;;
    docker)
        shift
        /usr/bin/env docker run -ti \
            --privileged \
            -v ./:/src \
            --rm \
            --name afl_fuzzing \
            "aflplusplus/aflplusplus:$AFL_VERSION" \
            bash -c "cd /src && bash -c \"$*\""
        ;;
    *)
        echo "Usage: $0 {host|docker}"
        exit 1
        ;;
esac
EOF
chmod +x ./afl++
afl++: Script to either run AFL++ on the host or within Docker. If using Docker, you can use the AFL_VERSION environment variable to set the version of AFL++ (e.g. v4.08c). Otherwise, the latest stable version is chosen.
Finally, before doing any fuzzing, run the
afl-system-config script, which configures your system to achieve up to 15% more executions per second.
./afl++ <host/docker> afl-system-config
This command needs to be executed after every reboot of the used system. If you additionally want to disable kernel security mitigations (e.g. against
Spectre) run the
afl-persistent-config script, reconfigure the bootloader, and reboot the system. Running the script is only supported if you are not using Docker and use the
grub bootloader, because the script reconfigures the latter. Mitigations should be disabled on the
bare-metal servers that host VMs and the VMs themselves. Remember, that after a reboot you want to re-execute afl-system-config.
./afl++ host afl-persistent-config
update-grub
reboot
./afl++ <host/docker> afl-system-config
After the reboot check whether the changes performed by afl-persistent-config were correctly applied by executing cat /proc/cmdline. The output should include mitigations=off. If not, then the grub bootloader was configured incorrectly: Verify the configuration in the file /etc/default/grub and the directory /etc/default/grub.d/. If any of the configuration files incorrectly overwrites GRUB_CMDLINE_LINUX_DEFAULT then mitigations are potentially not applied. This is for example true for cloud environments that use
cloud-init.
Theafl-system-configandafl-persistent-configscripts require root privileges and disable certain operating system security features. So, make sure to review the script and its output. Do not fuzz on a production system or your development environment. If you want to fuzz on, for example, your laptop, then create a VM. If you fuzz with Docker on Apple Silicon, then you are already running your Docker containers in a VM. Note that on Linux, when using Docker, the settings applied through theafl-system-configscript leak outside of the container even if the script was executed inside one.
Compile a fuzz test #
Creating a binary that fuzzes the SUT is straightforward. The resulting binary will use the harness and the AFL++ runtime.
The AFL++ fuzzer offers multiple compilation modes, including LTO, LLVM, and GCC. Refer to the linked documentation for more information about each. In order to decide for one, refer to the following figure:

Depending on the mode you choose, use a different compilation command: afl-clang-lto, afl-clang-fast, or afl-gcc, respectively. The C++ versions are also available by appending ++, which gives, e.g., afl-clang-lto++. The LTO mode is recommended because it features a better and faster instrumentation of the SUT. However, this depends on your project whether LTO mode works. Give it a try and fall back to the other modes if compilation fails.
If you use the Clang compiler and want to use the LLVM mode, then the following command produces a binary fuzzer. Essentially, we are replacing the call to clang++ with afl-clang-fast++. We are reusing the harness.cc and main.cc from the
introduction
./afl++ <host/docker> afl-clang-fast++ -DNO_MAIN=1 -O2 -fsanitize=fuzzer harness.cc main.cc -o fuzzIf your project depends on the GCC compiler, then consider using the gcc_plugin:
./afl++ <host/docker> afl-g++-fast -DNO_MAIN=1 -O2 -fsanitize=fuzzer harness.cc main.cc -o fuzzPRO TIP: The GCC version of your system and the GCC version that was used to compile the AFL++ GCC plugin must match. If they do not match (e.g., if you upgrade GCC), then you will get an error when using the GCC support.
We set the optimization level to -O2, which is a reasonable optimization level for fuzzing because it is likely the level used during production. Note that -g is not necessary, it is added by default by the AFL++ compilers.
Many things are happening behind the scenes when using AFL++:
- The
afl-clang-fast++binary is a wrapper script around Clang that enables specific compilation passes and features. - Coverage instrumentation is applied based on the used mode (i.e., LTO, LLVM, Clang, GCC).
- If you use
-fsanitize=fuzzer, then AFL++ becomes compatible with libFuzzer harnesses. If you do not use this flag, then AFL++ will fuzz the standard input of the program.
We created a binary called fuzz. The next section will describe how to use this binary to launch a fuzzing campaign.
Usage #
To launch a fuzzing campaign, first create a seeds directory. This represents the input of the fuzzer. AFL++ does not support an empty directory or a directory with only empty seed files.
mkdir seeds
echo "aaaa" > seeds/minimal_seed
Finally, we can launch the campaign.
./afl++ <host/docker> afl-fuzz -i seeds -o out -- ./fuzz
PRO TIP: In order to demonstrate how to set environment variables with the afl++ script, try setting the environment variable AFL_FAST_CAL to 1 to speed up the initial calibration phase:
./afl++ <host/docker> AFL_FAST_CAL=1 afl-fuzz -i seeds -o out -- ./fuzz
The output of the fuzzer will look like the following figure.
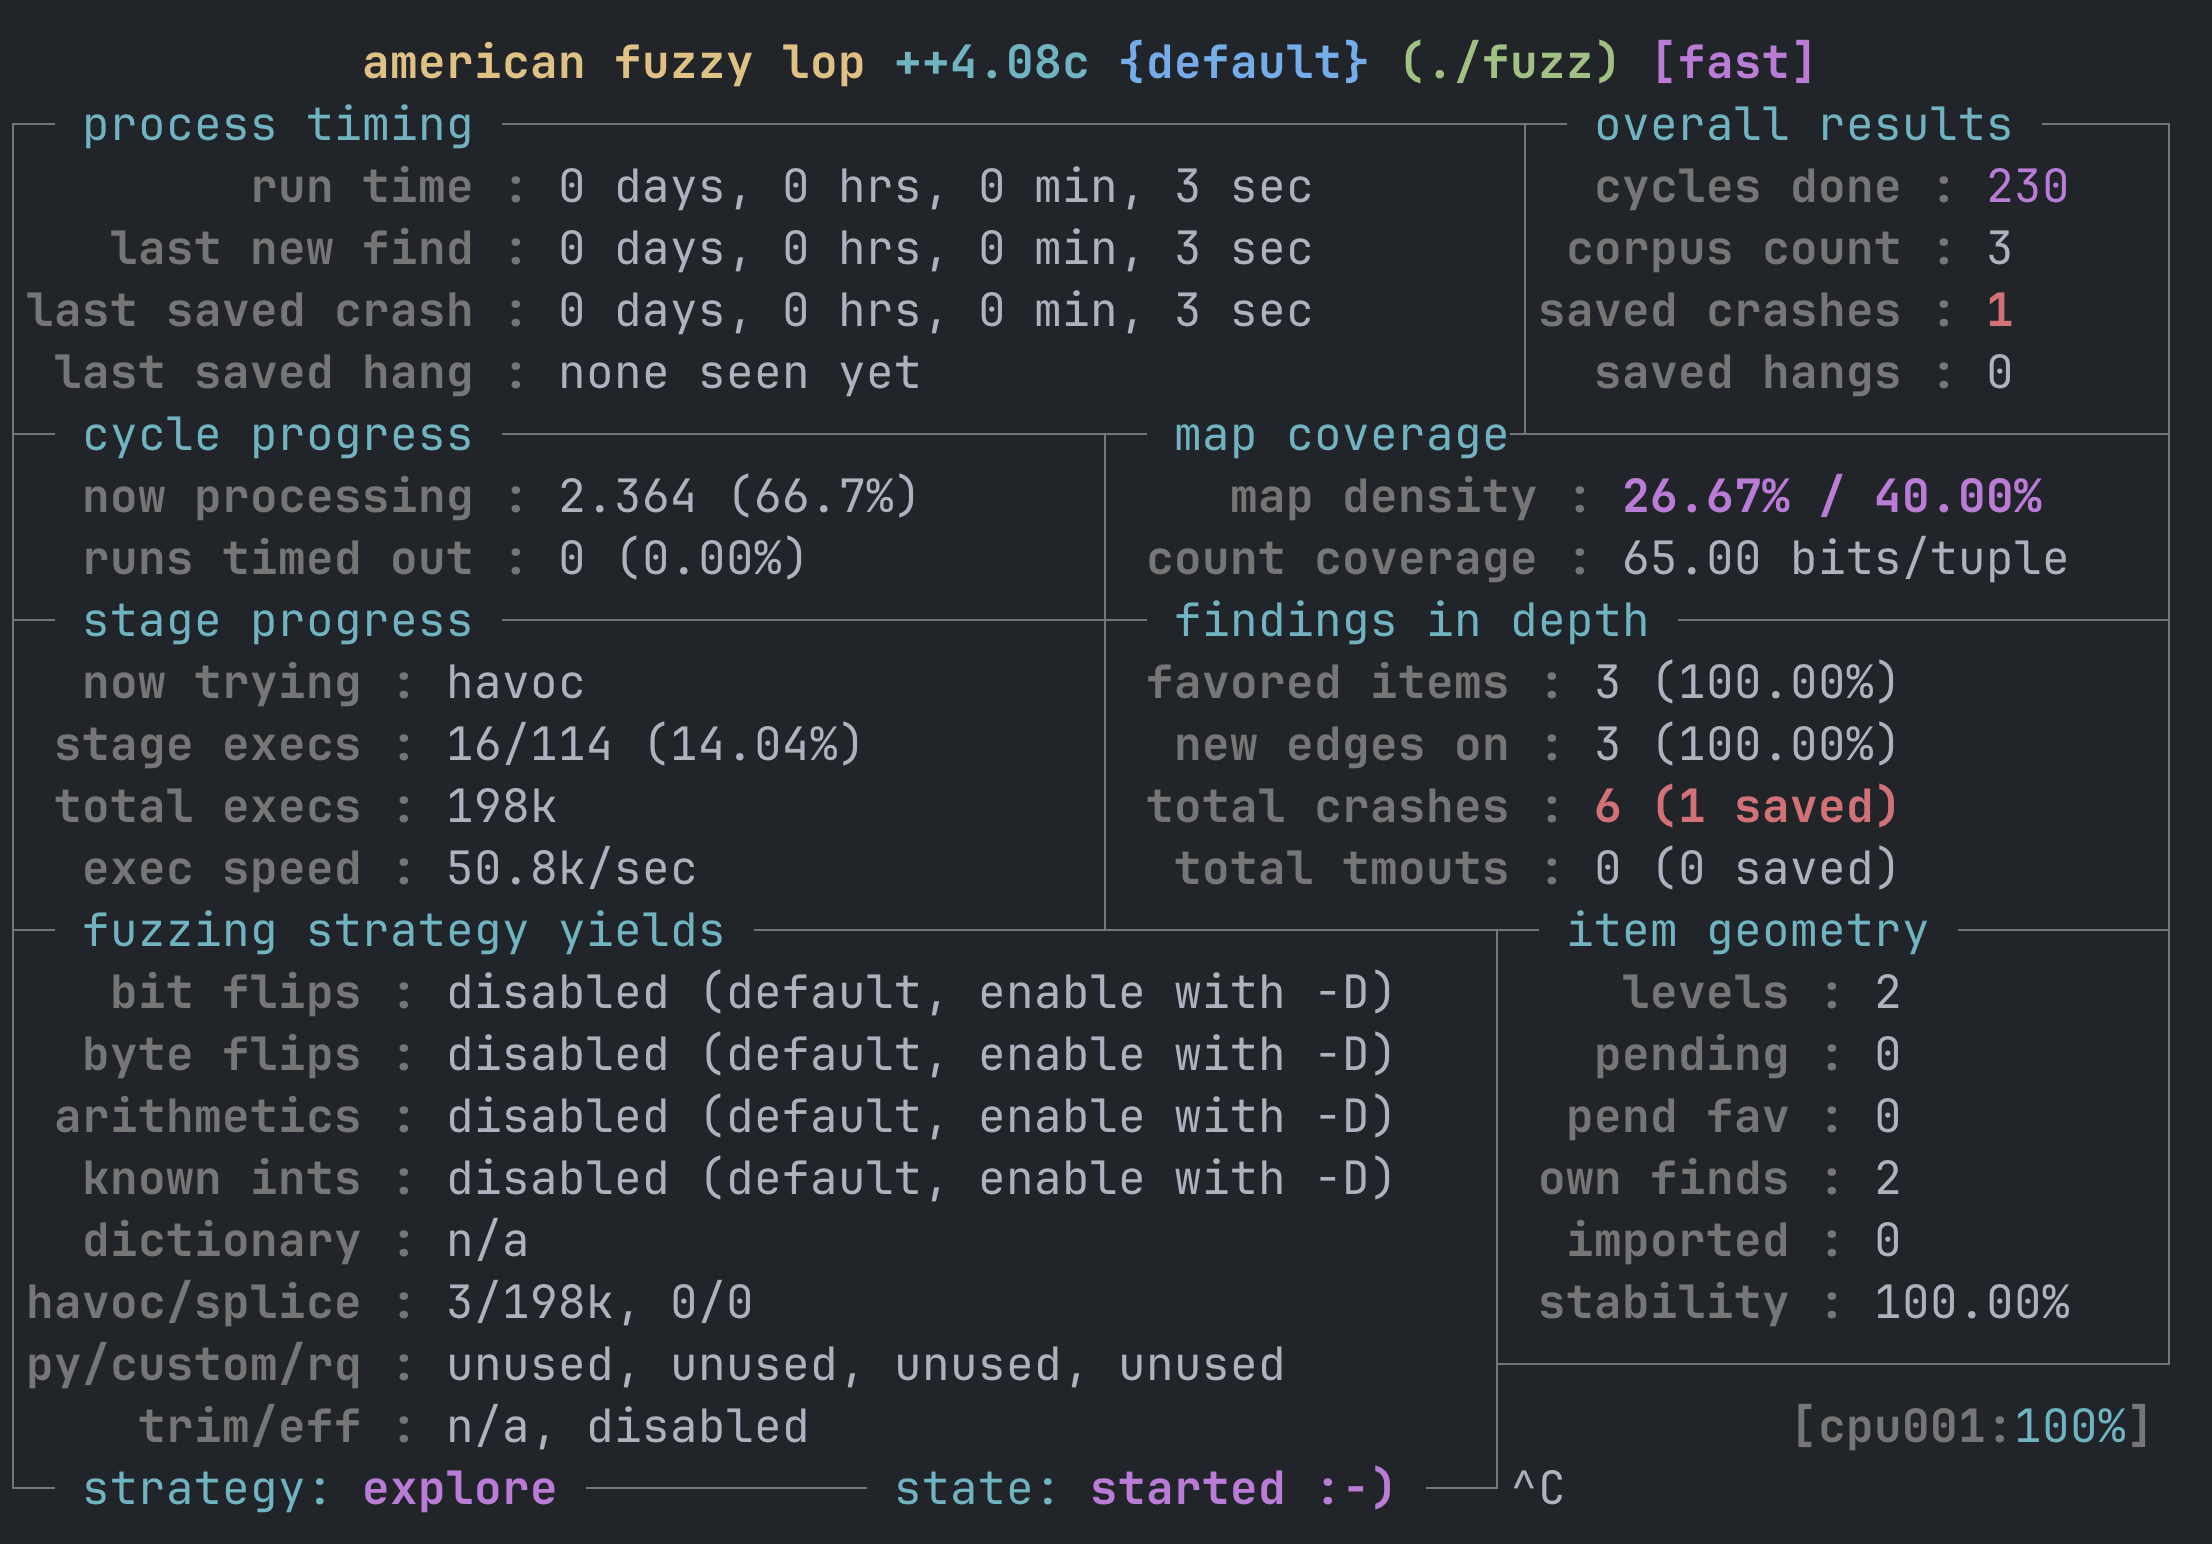
The output of the fuzzer is stored in the out directory. The following explains its contents:
out/default/
├── cmdline - How was the SUT invoked?
├── crashes - Directory with inputs that crash the SUT
│   ├── README.txt - How do I reproduce these crashes?
│   └── id:000000,sig:06,src:000002,time:286,execs:13105,op:havoc,rep:4
├── fuzz_bitmap - Internal fuzzer bit map
├── fuzzer_setup - What was the fuzzer environment and what afl-fuzz arguments were used?
├── fuzzer_stats - When did this campaign run? How long did it run? etc.
├── hangs - Directory with inputs that hang the SUT
├── plot_data - Data over time that can be plotted
└── queue - Test cases that reproduce the final fuzzer state when rerun
    ├── id:000000,time:0,execs:0,orig:minimal_seed
    └── id:000001,src:000000,time:0,execs:8,op:havoc,rep:6,+cov
    └── id:000002,src:000000,time:21,execs:894,op:havoc,rep:2,+cov
PRO TIP: The filename of a crash gives precise information about where it originated. The name id:000000,sig:06,src:000002,time:286,execs:13105,op:havoc,rep:4 indicates that the crash with ID 0 caused a signal 6 in the SUT. The crash input originates from the source test case with ID 2. Test case 2 originates from the seed input with the test case ID 0. Additional data indicates, for example, when the crash was discovered or which mutation led to the discovery.PRO TIP: The easiest way to gain insights into your fuzzing campaign during and after a campaign is finished is to look at the stats:
./afl++ <host/docker> afl-whatsup outAnd create a plot:
./afl++ <host/docker> afl-plot out/default out_graph/Note that you need to install gnuplot (e.g., apt install gnuplot) to run the above command.
Re-execute a test case #
To investigate bugs, a test case can be re-executed as with libFuzzer using the following command:
./afl++ <host/docker> ./fuzz out/default/crashes/<test_case>
However, the libFuzzer-like binaries produced by AFL++ cannot execute a whole directory, but only individual test cases. So if you want to execute multiple test cases (e.g., to gather coverage data), then you have to write a script to execute them one by one.
Refer to the help page for more information about libFuzzer-compatible binaries created by AFL++:
./afl++ <host/docker> ./fuzz -help=1
Fuzzer options #
The AFL++ fuzzer offers many options. The following options can be most useful with the afl-fuzz tool.
- -G 4000 The maximum length of the test input. By default, AFL++ uses 1048576 bytes. Setting this at least a few times higher than the minimal input size is advised. As a rule of thumb, we recommend finding a minimal realistic input and then doubling that. Note that larger input sizes lead to longer execution times and do not necessarily lead to a larger input space being explored.
- -t 1000 AFL++ aborts the execution of a test case after n milliseconds (default is 1000ms). It makes sense to set this to something reasonably low. The goal is also to find inputs that cause the SUT to hang for an unreasonably long amount of time. For example, parsing a reasonable-sized PNG image should not take longer than a few hundred milliseconds. So setting this to a few seconds is usually enough not to get false positives.
- -m 1000 The memory limit for test cases in megabytes. By default, this is set to 0, which means no limit. This should be set to a reasonable value like 1000. If this is set too low then you will see false positives, because occasionally test cases may take just slightly longer than usual (e.g., because of system load).
- -x ./dict.dict Specifies a dictionary file that guides the fuzzer and allows the fuzzer to discover interesting test cases more quickly. For more details about this, see Fuzzing dictionary.
Standard input (stdin) fuzzing #
The AFL++ fuzzer can execute instrumented binaries that take input from the standard input. This method works more slowly than writing a libFuzzer harness (LLVMFuzzerTestOneInput), but it can be easier to use because no harness needs to be written. The details for this are outlined in the following tip.
PRO TIP: AFL++ features several modes of executing the SUT. They differ in the way the target is executed. While this is an internal detail, it is good to keep in mind. A SUT can be executed through sub-processes, a deferred fork server, or persistent mode.
Sub-processes. For every test case, a sub-process is created (
execve). This is required when, for example, SUTs receive input through command-line arguments or standard input. In this case, a new process is started for each invocation. This mode can be enabled by setting the environment variableAFL_NO_FORKSRV=1. It is not advised to use this mode due to lower performance, but it may be required if the SUT performs initialization before the main function.Fork server. A sub-process is started for the SUT. The program is executed until the main function. Before starting the actual main function, the process is forked. For every execution, the process is forked from that execution point. This saves and reduces the amount of
execvesystem calls, which improves performance. This is available only when fuzzing via standard input.Persistent mode. The fuzzer is running test cases in a single process. When a test case crashes, a parent process restarts the fuzzing loop. This is available when using libFuzzer-style harnesses with
LLVMFuzzerTestOneInput. Note that it is important that the harness resets the state of the SUT clearly after each execution. Otherwise, executions could influence each other. The persistent mode relates to the__AFL_FUZZ_INIT()and__AFL_FUZZ_TESTCASE_BUFmacros.Shared memory fuzzing. With just persistent mode enabled, test cases are still passed via standard input or read from a file. The shared-memory feature relates to the
__AFL_INIT()and__AFL_LOOP(n)macros. Typically, when encountering an example online about the persistent mode, then shared memory fuzzing is also enabled. The example in Argument Fuzzing enables persistent mode and shared mode. If the fuzzing setup and operating system allow it, coverage information is exchanged using shared memory for all the above cases. This usage of shared memory is not related to the “shared memory” feature of AFL++.Persistent mode is generally preferred, as it is at least 10 times faster than the forkserver.
Let’s start by rewriting the original example to take input from stdin.
#include <stdio.h>
#include <stdlib.h>
#include <string.h>

#define MAX_BUF_SIZE 100

void check_buf(char *buf, size_t buf_len) {
    if(buf_len > 0 && buf[0] == 'a') {
        if(buf_len > 1 && buf[1] == 'b') {
            if(buf_len > 2 && buf[2] == 'c') {
                abort();
            }
        }
    }
}

int main() {
    char input_buf[MAX_BUF_SIZE];

    if (fgets(input_buf, MAX_BUF_SIZE, stdin) == NULL) {
        return 1;
    }

    size_t len = strlen(input_buf);
    check_buf(input_buf, len);
    return 0;
}
The example above reads now from standard input. It aborts for the input “abc”.
./afl++ <host/docker> afl-clang-fast++ -O2 main_stdin.c -o fuzz_stdin
The fuzzing campaign can be started in the same way as the libFuzzer-like harness.
./afl++ <host/docker> afl-fuzz -i seeds -o out -- ./fuzz_stdin
You will see that the execution speed is significantly slower compared to the fuzzing setup in Compile a fuzz test because the fuzzing is not running in persistent mode. Typically on a lower-end VM, you get below 1k executions per second without persistent mode and roughly 25k with it.
The above example no longer uses persistent mode, because we switched away from the libFuzzer harness. However, the persistent mode can be re-enabled, as shown in the next section.
Optimizing the fuzzer: Enable persistent mode & shared memory #
Enabling persistent mode improves fuzzing performance by a factor of 10 to 20 (see the above tip for details about why persistent mode is faster). Note that the initial version we started with already runs in persistent mode because it uses a libFuzzer-style harness. We will also enable shared memory for the fuzzing campaign, which means that test cases are passed from the fuzzer to the SUT via shared memory instead of using standard input, arguments, or reading from files.
If you already use LLVMFuzzerTestOneInput with AFL++, then this section is not relevant. This section is relevant if you want to improve your fuzzer that is not yet running in persistent mode. You can search the log output of afl-fuzz for “Persistent mode binary detected” to see if you are already using persistent mode.
Enabling persistent mode and shared memory requires adding a few lines of code:
- Add
__AFL_FUZZ_INIT();below the includes of the file where the main function is defined. - Instead of reading from standard input, define a variable that will get filled by AFL++ (if your input buffer comes from some other source like a file, then this example needs to be adjusted).
#ifdef __AFL_COMPILER unsigned char *input_buf; __AFL_INIT(); input_buf = __AFL_FUZZ_TESTCASE_BUF; #else char input_buf[MAX_BUF_SIZE]; if (fgets(input_buf, MAX_BUF_SIZE, stdin) == NULL) { return 1; } #endif - Place the target code within a while loop, setting the maximum number of iterations between 1k and 10k. This parameter dictates how many cycles occur before AFL++ restarts the process to manage memory leaks and issues related to global state. Choose smaller values if your fuzz target is unstable (e.g., leaks memory or keeps global state). Choose larger values if you believe your program is stable (e.g. if you are fuzzing a Rust library).
Note that the benefit of increasing the value to values like
1000korINT_MAXdoes likely not improve the performance by much if the restart time is reasonably small.while (__AFL_LOOP(1000)) { size_t len = strlen(input_buf); check_buf(input_buf, len); }
PRO TIP: Stability is quantified by the percentage of edges in the target that are considered “stable”. If repeatedly sending identical inputs results in the data traversing the same path through the target each time, then the stability is determined to be 100%.
Read here more about stability in AFL++ and here on how to improve stability.
If you fuzz with these changes, then you will notice that the execution per second of the fuzzer is higher. The reason for the higher performance is that the test inputs no longer come from standard input but from shared memory. For reference, here is the program with persistent mode enabled:
#include <stdio.h>
#include <stdlib.h>
#include <string.h>
__AFL_FUZZ_INIT();
#define MAX_BUF_SIZE 100
void check_buf(char *buf, size_t buf_len) {
if(buf_len > 0 && buf[0] == 'a') {
if(buf_len > 1 && buf[1] == 'b') {
if(buf_len > 2 && buf[2] == 'c') {
abort();
}
}
}
}
int main() {
#ifdef __AFL_COMPILER
unsigned char *input_buf;
__AFL_INIT();
input_buf = __AFL_FUZZ_TESTCASE_BUF;
#else
char input_buf[MAX_BUF_SIZE];
if (fgets(input_buf, MAX_BUF_SIZE, stdin) == NULL) {
return 1;
}
#endif
while (__AFL_LOOP(1000)) {
    size_t len = strlen(input_buf);
    check_buf(input_buf, len);
}
return 0;
}
More details about how to use persistent mode can be found here.
File input fuzzing #
AFL++ also supports fuzzing programs that read a file from disk. First, we rewrite our running example to use a command-line specified file as input.
#include <stdio.h>
#include <stdlib.h>
#include <string.h>

#define MAX_BUF_SIZE 100

void check_buf(char *buf, size_t buf_len) {
    if(buf_len > 0 && buf[0] == 'a') {
        if(buf_len > 1 && buf[1] == 'b') {
            if(buf_len > 2 && buf[2] == 'c') {
                abort();
            }
        }
    }
}
int main(int argc, char *argv[]) {
    char input_buf[MAX_BUF_SIZE];

    if (argc < 2) {
        fprintf(stderr, "Usage: %s <filename>\n", argv[0]);
        return 1;
    }

    FILE *file = fopen(argv[1], "r");
    if (file == NULL) {
        return 1;
    }

    if (fgets(input_buf, MAX_BUF_SIZE, file) == NULL) {
        if (!feof(file)) { // Check for reading error and not end of file
            fclose(file);
            return 1;
        }
    }

    fclose(file);

    size_t len = strlen(input_buf);
    check_buf(input_buf, len);
    return 0;
}
As usual, we use the AFL++ compiler wrappers to create an instrumented binary.
./afl++ <host/docker> afl-clang-fast++ -O2 main_file.c -o fuzz_file
Next, we start fuzzing. If we want to fuzz a file input instead of standard input, we must use @@ in the command line to specify where AFL++ should put the path to the file that was
written to disk.
./afl++ <host/docker> afl-fuzz -i seeds -o out -- ./fuzz_file @@
The fuzzer should find the crash quickly. For instructions on how to optimize the fuzzer, refer to
Enable persistent mode. If you like to keep using files as input, then you might want to use
fmemopen, which creates a file descriptor from a memory region.
Argument fuzzing #
First, we rewrite our running example to take input from the arguments directly. To fuzz arguments, you need to include the
argv-fuzz-inl.h header file containing the main function and add AFL_INIT_ARGV() at the beginning of the main.
#include <stdio.h>
#include <stdlib.h>
#include <string.h>

#ifdef __AFL_COMPILER
#include "argv-fuzz-inl.h"
#endif

void check_buf(char *buf, size_t buf_len) {
    if(buf_len > 0 && buf[0] == 'a') {
        if(buf_len > 1 && buf[1] == 'b') {
            if(buf_len > 2 && buf[2] == 'c') {
                abort();
            }
        }
    }
}

int main(int argc, char *argv[]) {
#ifdef __AFL_COMPILER
    AFL_INIT_ARGV();
#endif

    if (argc < 2) {
        fprintf(stderr, "Usage: %s <input_string>\n", argv[0]);
        return 1;
    }

    char *input_buf = argv[1];
    size_t len = strlen(input_buf);

    check_buf(input_buf, len);

    return 0;
}
Before compiling the above program, we need to download the required header.
curl -O https://raw.githubusercontent.com/AFLplusplus/AFLplusplus/stable/utils/argv_fuzzing/argv-fuzz-inl.h
We can now compile the instrumented binary and start the fuzzing as usual:
./afl++ <host/docker> afl-clang-fast++ -O2 main_arg.c -o fuzz_arg
./afl++ <host/docker> afl-fuzz -i seeds -o out -- ./fuzz_arg
If you do want to control the first argument that is set to the binary name, then use AFL_INIT_SET0("prog_name") instead of AFL_INIT_ARGV.
The fuzzer should find the crash quickly. For instructions on how to speed up this fuzzer, refer to
Enable persistent mode and use the macros AFL_INIT_ARGV_PERSISTENT(buf) and AFL_INIT_SET0_PERSISTENT("prog_name", buf) instead.
PRO TIP: How does the argument fuzzer work?
The
argv-fuzz-inl.hheader file defines two macros that use the input from the fuzzer to set up argv and argc:
- The
AFL_INIT_ARGV()macro initializes theargvarray with the arguments passed to the program from the command line. It then reads the arguments from standard input and puts them in the argv array. The array is terminated by twoNULLcharacters, and any empty parameter is encoded as a lone0x02character.- The
AFL_INIT_SET0(_p)macro is similar toAFL_INIT_ARGV()but also sets the first element of theargvarray to the value passed to it. This macro can be useful if you want to preserve the program’s name in theargvarray.Both macros rely on the
afl_init_argvfunction, which is responsible for reading a command line from standard input (by using thereadfunction) and splitting it into arguments. The function then stores the resulting array of strings in a static buffer and returns a pointer to that buffer. It also sets the value pointed to by theargcargument to the number of arguments that were read.If persistent mode is used, then the implementation is slightly different because the input is not read from standard input.
Additional resources #
- Fuzzing cURL. At Trail of Bits, we used argument fuzzing successfully to fuzz cURL.
- Sudo Vulnerability Walkthrough. LiveOverflow created a YouTube playlist on how to rediscover the CVE-2021-3156 bug from the sudo binary. Later in this chapter, we will explain the technique in more detail.
- Rediscovery of libpng bug. LiveOverflow created a YouTube video showing his attempt to rediscover CVE-2023-4863 and the obstacles he encountered.
Multi-core fuzzing #
AFL++ supports fuzzing on multiple cores. This has two advantages:
- More executions per second. This typically scales linearly with the amount of physical cores available.
- Asymmetrical fuzzing, which means we start multiple fuzzing jobs that are slightly different. For instance, one job might use AddressSanitizer, and the others don’t. That way, only one job is impacted by the performance penalty induced by AddressSanitizer. Interesting test cases found by the non-sanitized jobs are still executed using ASan when they are discovered to have the chance of detecting memory corruption bugs. Typically, you only have a single ASan job.
To manage multiple jobs, we use the job control of bash. Make sure to use bash or a compatible shell. First, we have to start a main fuzzing instance. We log to a file instead of standard output because following multiple outputs is inefficient. Make sure that the directory state/ does not exist.
Note the &, which makes AFL++ run in the background, allowing us to continue using the current shell. We redirect the standard output and error streams using 1>primary.log and 2>primary.error to files so the output is not printed to the terminal.
./afl++ <host/docker> afl-fuzz -M primary -i seeds -o state -- ./fuzz 1>primary.log 2>primary.error &
Now, we can start as many secondary jobs as we have idle cores available.
./afl++ <host/docker> afl-fuzz -S secondary01 -i seeds -o state -- ./fuzz 1>secondary01.log 2>secondary01.error &
./afl++ <host/docker> afl-fuzz -S secondary02 -i seeds -o state -- ./fuzz 1>secondary02.log 2>secondary02.error &
For each job, the AFL++ creates a subdirectory in state/. The fuzzing progress can be checked with the following two commands:
jobs: This command lists all currently running commands. If you don’t see all jobs running, check the.logand.errorfiles../afl++ <host/docker> afl-whatsup state/: Run this to list all currently running instances, their execution speed, and their results.
We recommend running the following command to get an update every second:
./afl++ <host/docker> watch -n1 --color afl-whatsup state/
The output of this command is shown below:
/usr/bin/afl-whatsup status check tool for afl-fuzz by Michal Zalewski

Individual fuzzers
==================

>>> ./fuzz instance: primary (0 days, 0 hrs) fuzzer PID: 706733 <<<

  last_find       : 3 minutes, 51 seconds
  last_crash      : 3 minutes, 51 seconds
  last_hang       : none seen yet
  cycles_wo_finds : 5412
  cpu usage 18.7%, memory usage 0.7%
  cycles 5433, lifetime speed 19040 execs/sec, items 0/3 (0%)
  pending 0/0, coverage 40.00%, crashes saved 1 (!)

>>> ./fuzz instance: secondary01 (0 days, 0 hrs) fuzzer PID: 706910 <<<

  last_find       : 3 minutes, 48 seconds
  last_crash      : 3 minutes, 48 seconds
  last_hang       : none seen yet
  cycles_wo_finds : 1961
  cpu usage 18.3%, memory usage 0.7%
  cycles 1963, lifetime speed 18681 execs/sec, items 1/3 (33%)
  pending 0/0, coverage 40.00%, crashes saved 1 (!)

>>> ./fuzz instance: secondary02 (0 days, 0 hrs) fuzzer PID: 706913 <<<

  last_find       : 3 minutes, 48 seconds
  last_crash      : 3 minutes, 48 seconds
  last_hang       : none seen yet
  cycles_wo_finds : 1370
  cpu usage 18.3%, memory usage 0.7%
  cycles 1372, lifetime speed 18017 execs/sec, items 2/3 (66%)
  pending 0/0, coverage 40.00%, crashes saved 1 (!)

Summary stats
=============

       Fuzzers alive : 3
      Total run time : 9 minutes, 0 seconds
         Total execs : 10 millions
    Cumulative speed : 55738 execs/sec
       Average speed : 18579 execs/sec
       Pending items : 0 faves, 0 total
  Pending per fuzzer : 0 faves, 0 total (on average)
       Crashes saved : 3
         Hangs saved : 0
Cycles without finds : 5412/1961/1370
  Time without finds : 3 minutes, 48 seconds
While the fuzzer instances are running, they share state and test cases with each other.
To stop the fuzzers, gracefully execute:
kill $(jobs -p)
More information and advanced use cases can be found here and here.
CMPLOG #
CMPLOG/RedQueen is the best path constraint solving mechanism available in any fuzzer. To enable it, the fuzz target needs to be instrumented for it. Before building the fuzzing target set the environment variable:
./afl++ <host/docker> AFL_LLVM_CMPLOG=1 make
No special action is needed for compiling and linking the harness.
To run a fuzzer instance with a CMPLOG instrumented fuzzing target, add -c0 to the command line arguments:
./afl++ <host/docker> afl-fuzz -c0 -S cmplog -i seeds -o state -- ./fuzz 1>cmplog.log 2>cmplog.error &
AddressSanitizer #
ASan helps detect memory errors that may otherwise go unnoticed. For instance, the following heap buffer overflow is usually not detectable without ASan.
 1void check_buf(char *buf, size_t buf_len) {
 2    char *last;
 3
 4    if(buf_len > 0 && buf[0] == 'a') {
 5        if(buf_len > 1 && buf[1] == 'b') {
 6            if(buf_len > 2 && buf[2] == 'c') {
 7                last = (char*)malloc(1 * sizeof(char)); // Allocate memory
 8                last[0] = 'c'; // Write the character 'c'
 9                last[1] = '\0'; // Write terminating null byte. A heap-buffer overflow is happening here!
10                printf("%s", last); // Print the string
11                free(last); // Free allocated memory
12            }
13        }
14    }
15}
For a general introduction to ASan, refer to AddressSanitizer.
To enable AddressSanitizer when using AFL++, set the environment variable AFL_USE_ASAN=1, which not only enables ASan but also disables
source fortification that is incompatible with ASan.
For example, to use ASan to find the bug in main_asan.cc, first compile using the corresponding flags:
./afl++ <host/docker> AFL_USE_ASAN=1 afl-clang-fast++ -DNO_MAIN=1 -O2 -fsanitize=fuzzer harness.cc main_asan.cc -o fuzz
When running the fuzzer, the above heap-buffer overflow will be discovered by the fuzzer. The settable memory limit via the -m flag is not supported with ASan because ASan allocates a huge amount of virtual memory: 20TB, which exceeds any reasonable memory limit.
Real-world examples #
libpng #
If you are fuzzing C projects that produce static libraries, you can follow this recipe:
- Read the
INSTALLfile in the project’s codebase (or other appropriate documentation) and find out how to create a static library. - Set the compiler to AFL++’s comiler wrapper (e.g.
afl-clang-fast++), and pass required flags to the compiler during compilation. - Build the static library, set the environment variable
AFL_USE_ASAN=1, and pass the flag-fsanitize=fuzzer-no-linkto the C compiler, which enables fuzzing-related instrumentations, without linking in the fuzzing engine. The runtime, which includes themainsymbol, is linked later when using the-fsanitize=fuzzerflag. The build step will create a static library, which we will refer to as$static_library. The environment variable enables ASan to detect memory corruption. - Find the compiled static library from step 3 and call:
./afl++ <host/docker> AFL_USE_ASAN=1 afl-clang-fast++ -fsanitize=fuzzer $static_library harness.cc -o fuzz. - You can start fuzzing by calling
./afl++ <host/docker> afl-fuzz -i seeds -o out -- ./fuzz.
Let’s go through these instructions for the well-known libpng library. First, we get the source code:
curl -L -O https://downloads.sourceforge.net/project/libpng/libpng16/1.6.37/libpng-1.6.37.tar.xz
tar xf libpng-1.6.37.tar.xz
cd libpng-1.6.37/
Now, make sure that the ./afl++ script is available in your current directory or adjust the paths to it below.
Before we can compile libpng, we have to install dependencies for it:
apt install zlib1g-dev
Next, we configure and compile libpng as a static library without linking libFuzzer.
Note that if you use Docker, then all dependencies for building your project need to be available in the specified Docker image in the ./afl++ script. This means that you may need to
create a Dockerfile and build a container yourself that is based on the AFL++ one.
export CC=afl-clang-fast CFLAGS=-fsanitize=fuzzer-no-link # Set C compiler and its flags for fuzzing
export CXX=afl-clang-fast++ CXXFLAGS="$CFLAGS" # Set C++ compiler and use C flags
./afl++ <host/docker> CC="$CC" CXX="$CXX" CFLAGS="$CFLAGS" CXXFLAGS="$CFLAGS" AFL_USE_ASAN=1 ./configure --enable-shared=no # Configure to compile a static library
./afl++ <host/docker> AFL_USE_ASAN=1 make # Run compilation
By default, the configuration script sets the optimization level to -O2, which is what we recommend in the
Compile a fuzz test section.
Next, we download a harness from GitHub. Usually, you would have to write a harness yourself. However, for this example, an existing one suffices.
curl -O https://raw.githubusercontent.com/glennrp/libpng/f8e5fa92b0e37ab597616f554bee254157998227/contrib/oss-fuzz/libpng_read_fuzzer.cc
Finally, we link together the instrumented libpng, the harness, and the libFuzzer runtime.
./afl++ <host/docker> AFL_USE_ASAN=1 $CXX -fsanitize=fuzzer libpng_read_fuzzer.cc .libs/libpng16.a -lz -o fuzz
Before we can launch the campaign, we need to prepare the seeds because AFL++ cannot start from an empty set of seeds. We do this by downloading a small example PNG file.
mkdir seeds/
curl -o seeds/input.png https://raw.githubusercontent.com/glennrp/libpng/acfd50ae0ba3198ad734e5d4dec2b05341e50924/contrib/pngsuite/iftp1n3p08.png
We also download a dictionary for the PNG format to better guide the fuzzer. A dictionary provides the fuzzer with some initial clues about the file format, such as which magic bytes PNG uses.
curl -O https://raw.githubusercontent.com/glennrp/libpng/2fff013a6935967960a5ae626fc21432807933dd/contrib/oss-fuzz/png.dict
The fuzzing campaign can be launched by running:
./afl++ <host/docker> afl-fuzz -i seeds -o out -x png.dict -- ./fuzz
CMake-based project #
Let’s assume we are using CMake to build the program mentioned in the
introduction. We add a CMake target that builds the main.cc and harness.cc and links the target together with AFL++. Note that we are excluding the main function through the NO_MAIN flag; otherwise, the program would have two main functions.
project(BuggyProgram)
cmake_minimum_required(VERSION 3.0)

add_executable(buggy_program main.cc)

add_executable(fuzz main.cc harness.cc)
target_compile_definitions(fuzz PRIVATE NO_MAIN=1)
target_compile_options(fuzz PRIVATE -O2 -fsanitize=fuzzer-no-link)
target_link_libraries(fuzz -fsanitize=fuzzer)
The non-instrumented binary can be built with the following commands:
./afl++ <host/docker> cmake -DCMAKE_C_COMPILER=clang -DCMAKE_CXX_COMPILER=clang++ .
./afl++ <host/docker> cmake --build . --target buggy_program
The fuzzer can be built by choosing the fuzz target and changing the compiler:
./afl++ <host/docker> cmake -DCMAKE_C_COMPILER=afl-clang-fast -DCMAKE_CXX_COMPILER=afl-clang-fast++ .
./afl++ <host/docker> cmake --build . --target fuzz
The fuzzing campaign can be launched by running:
./afl++ <host/docker> afl-fuzz -i seeds -o out -- ./fuzz
More examples of different build systems can be found here.
Additional resources #
- AFL++: Combining Incremental Steps of Fuzzing Research. Paper about AFL++.
- Fuzzing in Depth. Advanced documentation by the AFL++ team.
- AFL++ Under The Hood. Blog post about AFL++ internals.